Crispy Homemade Gluten-Free Onion Rings: The Crunch You’ve Been Missing
Crispy Homemade Gluten-Free Onion Rings: The Crunch You’ve Been Missing
If you love a good crunch and want to keep things gluten-free without sacrificing texture, these onion rings deliver a golden, crispy coating with a tender sweet onion center. Friendly, approachable, and foolproof, this recipe uses simple pantry ingredients and a panko-style breadcrumb finish for that irresistible snap. For more crunchy-sweet snack inspiration, check out my ultimate churro cookies guide for another easy homemade treat.
Why make this recipe
If you’re tired of soggy, bland gluten-free fried snacks, this recipe is perfect because it solves the common problems of gummy coatings and dense crumbs by combining a light flour dredge, a buttermilk-enriched egg dip, and crispy gluten-free panko. The result: onion rings that are golden, airy, and stay crisp longer after frying. It’s a reliable, repeatable method that works with everyday ingredients and gives you restaurant-style crunch at home.
Ingredients
- 2 large sweet onions
- 1 cup gluten-free all-purpose flour blend
- 1 tsp baking powder
- 1 tsp salt
- 1/2 tsp smoked paprika
- 1/2 tsp garlic powder
- 2 large eggs
- 1 cup buttermilk (or milk + 1 tbsp lemon juice)
- 2 cups gluten-free panko-style breadcrumbs
- Oil for frying (neutral oil with high smoke point such as vegetable, canola, or sunflower)
Step-by-Step Guide to Making Crispy Homemade Gluten-Free Onion Rings
Overview of the method
This recipe uses a three-bowl dredge: seasoned flour, an egg-and-buttermilk bath, and gluten-free panko. The flour gives the first layer for adhesion, the egg mixture creates a binder and adds richness, and the panko creates the crunchy exterior. Frying at a steady 350°F (175°C) for short bursts gives even browning without overcooking the onion.
Prep and mise en place
- Choose the right onion: Sweet onions (Vidalia, Walla Walla, or other mild types) caramelize slightly as they fry and taste great with a crisp coating.
- Slice uniformly: Aim for 1/2-inch-thick slices so rings cook evenly. If rings are too thin they may burn or become too limp; if too thick they may not brown before the onion softens.
- Dry the rings: Pat onion slices with paper towels after separating into rings — excess moisture makes coating slide off.
Making the coating
- In the first bowl, mix the gluten-free flour, baking powder, salt, smoked paprika, and garlic powder. The baking powder helps the coating puff slightly when fried.
- In the second bowl, whisk the eggs and buttermilk until smooth. If you don’t have buttermilk, stir 1 tbsp lemon juice into 1 cup milk and let sit 5 minutes to thicken slightly.
- In the third bowl, place the gluten-free panko-style breadcrumbs. Use good-quality panko for a light, flaky crunch. If your panko is coarse, pulse it a couple of times in a food processor for finer coverage that still stays crisp.
Coating technique for best adhesion
- Dredge each ring first in the seasoned flour, shaking off any excess. The flour forms the first tactile layer so the egg clings.
- Dip the floured ring into the egg-and-buttermilk mixture, allowing excess to drip back into the bowl.
- Press the ring into the panko, pressing gently on both sides so the crumbs adhere well. Flip and press the other side. A light but firm press ensures the crumbs won’t slough off in the oil.
- Place coated rings on a wire rack set over a baking sheet while you heat the oil — this prevents steaming the crumbs and keeps the coating dry before frying.
Frying for perfect color and crunch
- Heat oil in a deep fryer or heavy-bottomed pot to 350°F (175°C). Use a thermometer — maintaining consistent temperature is key. If oil is too cool, rings absorb oil and become greasy; too hot and the coating will burn before the onion softens.
- Fry in batches — don’t overcrowd the fryer. Overcrowding drops oil temperature and leads to uneven browning.
- Fry for 2–3 minutes per batch until golden brown and crisp. Rotate rings as needed to ensure even coloring.
- Remove with a spider or slotted spoon and transfer to paper towels to drain. Finish on a warm oven rack (200°F / 90°C) if making multiple batches so earlier fried rings stay crisp while you finish.
Final seasoning and serving
- Sprinkle a little flaky salt right after frying for the best adherence and flavor. Consider a light dusting of extra smoked paprika or finely chopped fresh herbs for visual appeal.
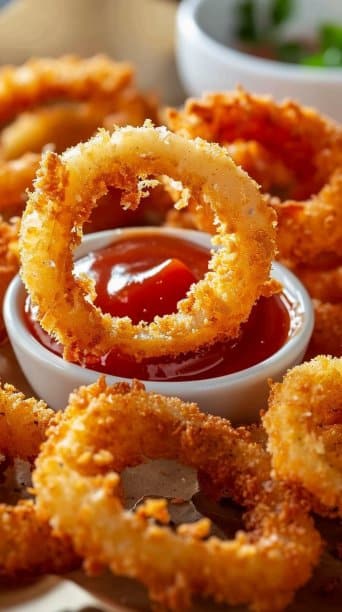
- Serve hot with your favorite dipping sauces — ketchup and aioli are classic, but tangy yogurt-based dips or spicy sriracha mayo complement the sweet onion beautifully.
Directions
- Peel onions and cut into 1/2-inch slices. Separate into rings.
- In the first bowl, mix flour, baking powder, salt, paprika, and garlic powder.
- In the second bowl, whisk eggs and buttermilk.
- In the third bowl, place breadcrumbs.
- Dredge onion rings in flour, dip in egg mixture, then coat in breadcrumbs. Press gently to adhere.
- Heat oil in a deep fryer or heavy pot to 350°F (175°C).
- Fry onion rings in batches for 2–3 minutes until golden brown.
- Drain on paper towels and serve hot with your favorite dipping sauce.
Best Way to Store Crispy Homemade Gluten-Free Onion Rings
- Short-term (room temperature): 1–2 hours on a cooling rack to keep crisp.
- Refrigerator: 2–3 days in an airtight container; reheat to restore crispness.
- Freezer: Up to 1 month if flash-frozen on a tray then transferred to a sealed bag; best reheated from frozen.
- Reheating temperature: Reheat in a 375°F (190°C) oven or air fryer until crisp (about 8–12 minutes, turning once).
Serving Suggestions for Crispy Homemade Gluten-Free Onion Rings
- Classic platter: Serve hot with ketchup, spicy mayo, and ranch dressing for dipping.
- Burger sidekick: Place alongside a juicy burger or your favorite plant-based sandwich for a satisfying combo.
- Snack board: Add to a casual snack board with pickles, cheese, and smoked nuts for game-day gatherings.
- Tacos and bowls: Use as a crunchy garnish on BBQ bowls or pulled-pork-style tacos to add texture and sweetness.
Tips to make Crispy Homemade Gluten-Free Onion Rings
Q: How do I keep the coating from falling off?
A: Ensure the rings are well-dredged in flour before dipping in the egg mixture, and press the panko gently but firmly to adhere.
Q: Can I make these without deep frying?
A: Yes — you can bake or air-fry them, but expect slightly different texture: air-frying at 400°F (200°C) for about 10–12 minutes (turning once) gives a good crisp with less oil.
Q: What oil is best for frying?
A: Use a neutral oil with a high smoke point like vegetable, canola, or sunflower oil.
Variations
- Buttermilk-Tempura Twist (paragraph): For a lighter, cloudlike batter, whisk 1 cup gluten-free flour with 1 cup cold sparkling water and 1 tsp baking powder, then dip rings straight into this batter and dust with panko before frying. This yields a thinner, airy coat with a delicate crunch.
- Cheese & Herb Panko (bulleted):
- Mix 1/2 cup finely grated Parmesan (or a dairy-free alternative) and 1 tbsp finely chopped parsley into the panko.
- For extra flavor, add 1/4 tsp onion powder and 1/4 tsp cayenne to the flour mix.
FAQs
Q: Can I prepare the onion rings ahead of time?
A: You can coat the rings and keep them on a wire rack in the fridge for up to 2 hours before frying; avoid coating too far ahead or the panko will absorb moisture and lose crispness.
Q: What makes gluten-free panko different from regular panko?
A: Gluten-free panko is made from gluten-free flours and often has a slightly different texture; choose brands labeled panko-style crumbs for the flakiest results.
Q: How can I make these less greasy?
A: Maintain oil temperature at 350°F, fry in small batches, and drain on paper towels then a wire rack. Overcrowding and low oil temperature are the most common causes of greasiness.
Q: Will these work with regular wheat flour?
A: Yes — you can substitute regular all-purpose flour if you don’t need them gluten-free; adjust seasonings as needed.
Q: Are these suitable for kids?
A: Absolutely. Sweet onions and a mild, crispy coating make these a favorite for younger eaters; serve with mild dipping sauces.
Troubleshooting: Common issues and fixes
- Coating falls off: Make sure to pat rings dry, dredge in flour first, and press panko firmly.
- Soggy rings: Oil too cool or overcrowding; always fry at the proper temp in small batches.
- Too dark outside, raw inside: Oil too hot and rings too thick — lower heat and slice to consistent 1/2-inch thickness.
Make-ahead and party planning
If you’re serving these for a party, fry just before guests arrive or keep batches warm in a low oven (200°F / 90°C) on a wire rack. You can also par-fry for 1 minute, cool, and refrigerate; then finish frying just before serving for fresher results and shorter final fry time.
Nutrition and dietary notes
- Naturally gluten-free if you use certified gluten-free flour and breadcrumbs.
- You can reduce oil absorption slightly by using cornstarch mixed with the flour (replace 2 tbsp of flour with cornstarch).
- For dairy-free, use plant-based milk with 1 tbsp lemon juice instead of buttermilk and confirm your breadcrumbs are dairy-free.
Equipment checklist
- Sharp knife and cutting board for uniform rings
- Three bowls for dredging stations
- Deep fryer or heavy-bottomed pot and a candy or frying thermometer
- Spider/skimmer and slotted spoon for frying
- Wire rack and baking sheet to keep rings crisp after frying
Final plating ideas
Arrange onion rings in a neat stack on parchment, sprinkle with flaky sea salt, and present alongside small ramekins of dips for a bistro-style look. Top with microgreens or finely chopped chives for color and a touch of freshness.
Conclusion
If you’re looking to expand your gluten-free recipe repertoire beyond snacks, consider pairing these onion rings with a hearty sandwich — like this flavorful Indian-style vegetable burger recipe that offers bold spices and complementary textures. For hands-on help and more gluten-free techniques that will improve your frying and coating skills, check out the Gluten Free Cooking School’s class bundle to learn from experts and practice new recipes.
Print
Crispy Homemade Gluten-Free Onion Rings
- Total Time: 25 minutes
- Yield: 4 servings 1x
- Diet: Gluten-Free
Description
These onion rings deliver a golden, crispy coating with a tender sweet onion center, perfect for gluten-free snacking.
Ingredients
- 2 large sweet onions
- 1 cup gluten-free all-purpose flour blend
- 1 tsp baking powder
- 1 tsp salt
- 1/2 tsp smoked paprika
- 1/2 tsp garlic powder
- 2 large eggs
- 1 cup buttermilk (or milk + 1 tbsp lemon juice)
- 2 cups gluten-free panko-style breadcrumbs
- Oil for frying (neutral oil with high smoke point such as vegetable, canola, or sunflower)
Instructions
- Peel onions and cut into 1/2-inch slices. Separate into rings.
- In the first bowl, mix flour, baking powder, salt, paprika, and garlic powder.
- In the second bowl, whisk eggs and buttermilk.
- In the third bowl, place breadcrumbs.
- Dredge onion rings in flour, dip in egg mixture, then coat in breadcrumbs. Press gently to adhere.
- Heat oil in a deep fryer or heavy pot to 350°F (175°C).
- Fry onion rings in batches for 2–3 minutes until golden brown.
- Drain on paper towels and serve hot with your favorite dipping sauce.
Notes
Short-term storage: Keep at room temperature for 1–2 hours. Refrigerate for 2–3 days in an airtight container. Freeze for up to 1 month.
- Prep Time: 15 minutes
- Cook Time: 10 minutes
- Category: Snack
- Method: Frying
- Cuisine: American
Nutrition
- Serving Size: 1 serving
- Calories: 200
- Sugar: 3g
- Sodium: 600mg
- Fat: 9g
- Saturated Fat: 1g
- Unsaturated Fat: 5g
- Trans Fat: 0g
- Carbohydrates: 28g
- Fiber: 2g
- Protein: 4g
- Cholesterol: 50mg
Keywords: onion rings, gluten-free, crunchy snack, frying, appetizers