How to Freeze Corn on the Cob with a Foodsaver
When sweet summer corn is in season, there’s nothing better than preserving it to enjoy all year round. One of the best ways to do this is to freeze corn on the cob using a Foodsaver vacuum sealer. This method locks in freshness, preserves flavor, and prevents freezer burn.
Table of Contents
If you’re wondering whether freezing corn really keeps that fresh-from-the-farm taste intact—yes, it does. But only if you follow the correct method, including blanching and vacuum sealing. This guide will walk you through everything step-by-step.
Why Freeze Corn on the Cob?
There are several reasons to freeze corn, especially if you’re harvesting your own or buying in bulk during peak season:
- Preserves the sweet, juicy flavor of summer corn
- Keeps the nutrients intact
- Prevents waste from overripe or unused corn
- Makes mealtime easier in winter months
Freezing corn properly also keeps it safe for months. According to the National Center for Home Food Preservation, when properly blanched and stored at 0°F or below, frozen corn maintains top quality for up to 12 months.
What is a Foodsaver Vacuum Sealer and Why Use It?
A Foodsaver vacuum sealer is a device that removes air from specially designed bags and seals them shut, preventing freezer burn and moisture loss. This is especially useful for high-moisture foods like corn.
Using a Foodsaver ensures:
- No oxygen exposure = longer freshness
- Minimal chance of freezer burn
- Space-saving packaging
- Ideal conditions for long-term storage
As the University of Illinois Extension explains, vacuum sealing works best when paired with proper blanching and immediate freezing.
Choosing the Best Corn
Start with the best-quality corn:
- Husks should be bright green and tightly wrapped
- Silks should be golden and not dried out
- Kernels should be plump, juicy, and pale yellow
Avoid overripe corn with dry, dark yellow kernels or underdeveloped cobs with tiny kernels. Ideally, corn should be frozen as soon as possible after picking.

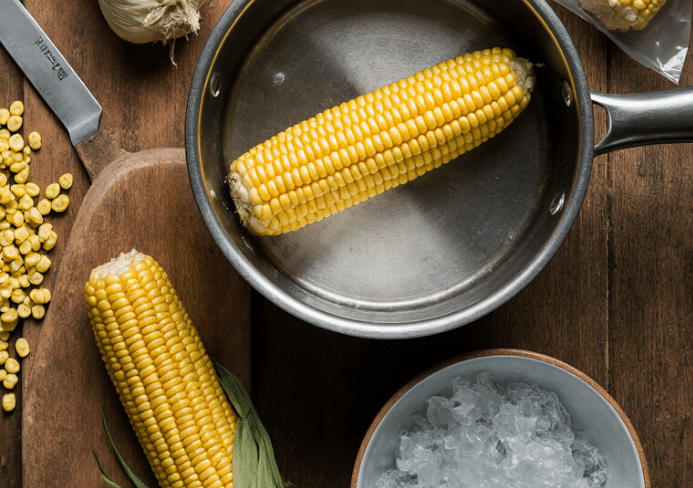
Prepping the Corn for Freezing
Before you freeze, you’ll need to prepare your corn:
- Shuck the corn: Peel off the husks and remove all silk. Use a corn-silk brush or damp paper towel for stubborn strands.
- Trim ends: Remove any damaged tips or roots.
- Rinse the corn well under cold water to remove debris.
Why Blanching is Crucial
Blanching—briefly boiling the corn before freezing—is a necessary step. It stops enzyme action that can cause:
- Texture breakdown
- Color loss
- Nutrient deterioration
How to Blanch Corn on the Cob:
- Boil water in a large pot.
- Submerge cobs fully.
- Start timing once the water returns to a boil:
- Small cobs: 7 minutes
- Medium: 9 minutes
- Large: 11 minutes
- Immediately transfer to an ice bath for the same length of time.
- Pat completely dry with a paper towel.
Drying and Prepping for Vacuum Sealing
Before sealing, ensure the corn is dry. Moisture will interfere with the vacuum seal and may cause ice crystals to form.
- Pat cobs thoroughly dry
- Let air dry for a few minutes for extra insurance
How to Freeze Corn on the Cob with a Foodsaver
Once blanched and dried, you’re ready to use your Foodsaver.
Step-by-step:
- Insert each cob into a Foodsaver bag
- Place the bag into the sealing chamber
- Set seal level to 4 or 5 for vegetables
- Press the Vacuum button
- Once air is removed, press Seal
Store the bags flat in your freezer at or below 0°F.
No Foodsaver? Try This Alternative
If you don’t own a Foodsaver, you can still preserve your corn effectively:
- Wrap each cob tightly in plastic wrap or Saran wrap
- Place the wrapped cobs in a heavy-duty ziplock freezer bag
- Squeeze out as much air as possible
- Seal, label, and freeze
This won’t last as long as vacuum sealing but can still preserve corn for 4–6 months.
Other Ways to Freeze Corn
Freezing Whole Kernels
- Blanch corn as above
- Cut kernels from cob using a Bundt pan to catch them
- Vacuum seal or place in airtight freezer bags
Freezing Creamed Corn
- After removing kernels, scrape the cob to collect juice
- Cook with kernels for 10 minutes until thickened
- Cool and store in airtight containers with a ½-inch headspace
Reheating Frozen Corn
When ready to enjoy:
- Boiling method: Place directly in boiling water for 5–6 minutes
- Microwave: Heat for 3–4 minutes on high (adjust based on size)
Avoid thawing before reheating to maintain texture and flavor.
Storage Guidelines
- Store at or below 0°F
- Label with date and contents
- Use within 12 months for best taste
FAQs
Do I really need to blanch the corn first?
Yes. Blanching stops enzyme activity, which preserves taste and texture. Otherwise, corn may turn mushy or lose sweetness.
Can I vacuum seal corn raw?
Technically yes, but it will deteriorate faster. Always blanch first for best results.
Why is my corn mushy after freezing?
Likely due to over-blanching or freezing too slowly. Use proper timing and freeze immediately.
What if I already froze unblanched corn?
It’s still safe to eat. You may notice changes in texture after a few months.
Should I thaw corn before reheating?
No. Cook directly from frozen to preserve structure and prevent overcooking.
My Foodsaver isn’t sealing—what should I do?
If moisture is interfering, pre-freeze corn in a ziplock for 1 hour, then vacuum seal.
Final Tips
- Harvest corn early in the morning for peak freshness
- Don’t overcrowd the pot during blanching—it slows the return to boil
- Freeze in small batches for consistent results
- Try super-sweet varieties like Silver Queen for the best freezing texture
With the right steps, you’ll have delicious, vacuum-sealed corn ready to enjoy any time of year.
PrintHow to Freeze Corn on the Cob with a Foodsaver
- Total Time: 30–40 min
- Yield: Varies by quantity of corn
- Diet: Vegan
Description
A simple and effective method to freeze fresh corn on the cob using a vacuum sealer or ziplock bags. Ideal for preserving summer sweetness year-round.
Ingredients
- Fresh corn on the cob (as many as desired)
- Ice
- Water (for boiling)
- Foodsaver vacuum sealer bags or ziplock bags
- Saran wrap (optional if not using a vacuum sealer)
Instructions
- Step 1: Choose and Prep the Corn
Select ears with green husks, plump kernels, and fresh silks. Shuck and remove all silk. Rinse thoroughly. - Step 2: Blanch the Corn
Bring a large pot of water to a rolling boil. Add corn:
• Small cobs: 7 minutes
• Medium cobs: 9 minutes
• Large cobs: 11 minutes
Transfer to an ice bath for the same amount of time. Drain and pat dry completely. - Step 3: Vacuum Seal
Place corn into Foodsaver bags. Use vacuum + seal function (level 4 or 5 recommended). Label and date. - Step 4: Freeze
Lay sealed bags flat in freezer at or below 0°F. Corn stays fresh up to 12 months.
Notes
If you don’t have a vacuum sealer, wrap each cob tightly in plastic wrap and store in ziplock freezer bags, removing as much air as possible. Freeze promptly after blanching.
- Prep Time: 15 min
- Cook Time: 7–11 min
- Category: Preservation
- Method: Blanching & Freezing
- Cuisine: American
Nutrition
- Serving Size: 1 cob
- Calories: 110
- Sugar: 6g
- Sodium: 0mg
- Fat: 1g
- Saturated Fat: 0g
- Unsaturated Fat: 0.5g
- Trans Fat: 0g
- Carbohydrates: 25g
- Fiber: 2g
- Protein: 3g
- Cholesterol: 0mg
Keywords: how to freeze corn, corn preservation, vacuum seal corn, blanching corn for freezer, food storage