Homemade Plum Jelly Recipe: A Sweet Delight for Your Pantry
plum jelly recipe : if you’ve ever tasted the rich, fruity goodness of plum jelly, you know how special it can be. Making your own at home brings out a freshness you can’t find in store-bought versions. Whether you’re filling your pantry, preparing gifts, or just looking to savor the season’s plums, this recipe offers a delightful balance of sweet and tart that elevates any meal.
Table of Contents
Unlike commercial jellies filled with additives, homemade plum jelly is clean, simple, and bursting with flavor. Plus, by using the proper canning process, you can preserve that summer taste all year long. If you’re new to canning, check out these trusted safety guidelines to learn how to safely store your jelly for long-term use.
What makes this jelly unique is how the natural pectin in plums reacts with sugar and heat to create a perfectly set texture. Curious about how that transformation works? Here’s a helpful breakdown of pectin science that explains what’s happening behind the scenes during jelly-making.
What is Plum Jelly?
Plum jelly is a smooth fruit preserve made by boiling plum juice with sugar and pectin. Unlike jam, jelly contains no fruit pieces—it’s all about the clear, jewel-toned gel. It’s perfect for:
- Spreading on toast or scones
- Pairing with cheese
- Glazing meats like pork or lamb
- Filling baked goods
Why Make Homemade Plum Jelly?
There are plenty of reasons to go DIY:
- No artificial ingredients — Just fruit, sugar, and natural pectin
- Control sweetness — Adjust the sugar to your taste
- Flavor customizations — Add herbs or spices
- Long shelf life — When canned properly
Best Plums for Jelly
Choosing the right plums makes a big difference. Look for:
- Red plums — Rich in color and flavor
- Damson — Naturally tart and high in pectin
- Santa Rosa — Balanced sweetness
- Black plums — Deep flavor and intense color
Make sure your plums are:
- Ripe but not mushy
- Free of blemishes or mold
- Washed and pitted before cooking
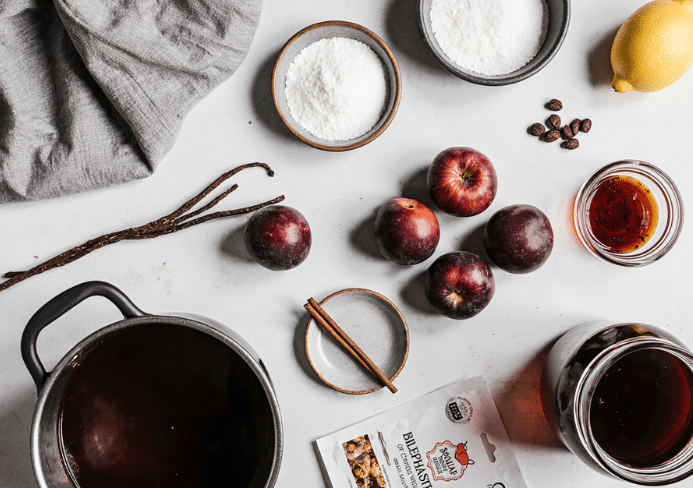
Ingredients & Tools You’ll Need
Ingredients:
- 5 pounds of fresh plums (red or purple preferred)
- 1/4 cup lemon juice
- 7 cups granulated sugar
- 1 packet powdered pectin (1.75 oz)
Optional add-ins:
- 1 cinnamon stick
- 1 vanilla bean
- 2-3 cloves (for spice)
Tools:
- Large stockpot
- Cheesecloth or jelly bag
- Canning jars with lids
- Funnel and ladle
- Jar lifter
- Water bath canner or large boiling pot
Step-by-Step: Homemade Plum Jelly Recipe
Step 1: Prepare the Fruit
- Wash, pit, and cut plums (leave skins on)
- Place them in a pot with enough water to cover (about 4 cups)
- Simmer 20–30 minutes until soft
Step 2: Extract the Juice
- Pour cooked fruit into a cheesecloth-lined strainer or jelly bag
- Let it drip naturally for several hours (don’t squeeze or jelly may be cloudy)
Step 3: Cook the Jelly
- Measure 4 cups of plum juice into a clean pot
- Add lemon juice and pectin
- Bring to a rolling boil while stirring
Step 4: Add Sugar and Boil
- Add all sugar at once, stir constantly
- Boil hard for 1–2 minutes until mixture reaches 220°F or passes the sheet/spoon test
Step 5: Jar and Seal
- Remove from heat, skim foam if needed
- Ladle hot jelly into sterilized jars
- Wipe rims, apply lids, and screw bands fingertip-tight
Step 6: Process in Water Bath
- Place jars in boiling water bath for 10 minutes
- Remove and let cool completely
Troubleshooting Tips
Common issues and how to fix them:
- Jelly didn’t set: May need to reboil with extra pectin
- Too stiff: Overcooked or too much pectin
- Cloudy jelly: Juice was squeezed or not properly strained
- Foam on top: Skim with spoon before jarring
Safety Tips for Jelly Making
- Always use sterilized jars
- Check jar seals after 24 hours
- Label with date and flavor
- Discard any jelly with mold or unusual smell
Flavor Variations to Try
You can get creative with flavor infusions:
- Cinnamon plum jelly — Add a stick of cinnamon while boiling
- Plum-rosemary jelly — Infuse with a small sprig of rosemary
- Vanilla plum jelly — Add half a vanilla bean during cooking
- Plum wine jelly — Replace 1/2 cup plum juice with red wine
How to Store & Preserve Jelly
- Store unopened jars in a cool, dark place
- Refrigerate after opening
- Lasts 12–18 months sealed, 3–4 weeks opened
- You can also freeze jelly if you skip canning
Serving Suggestions
Add a sweet twist to your dishes:
- Spread on toast, biscuits, or pancakes
- Pair with soft cheeses like brie or goat cheese
- Glaze meats like pork tenderloin or duck breast
- Use in thumbprint cookies or as tart filling
Gift-Giving Ideas
Homemade plum jelly makes an elegant, heartfelt gift. Dress it up with:
- Handwritten labels or tags
- Decorative fabric covers for jar lids
- Small baskets with tea, biscuits, or jam spoons
Perfect for holidays, birthdays, or hostess gifts.
Nutrition Facts (Approximate per Tablespoon)
- Calories: 50
- Sugar: 12g
- Fat: 0g
- Fiber: 0g
- Vitamin C: Trace
FAQs
Can you make plum jelly without pectin?
Yes, but it may require longer boiling and won’t set as firmly.
What’s the difference between plum jam and jelly?
Jam includes mashed fruit, jelly is made from fruit juice only.
How do I know when jelly is done cooking?
Use a thermometer (220°F) or do the spoon/sheet test.
Can I reuse store-bought jars?
Yes, but always use new lids and ensure they’re crack-free and sterilized.
What’s the best way to extract juice from plums?
Simmer and strain through cheesecloth without squeezing to keep it clear.
Final Thoughts
Making homemade plum jelly is a deeply satisfying way to preserve the season’s bounty. With a few simple tools and a little patience, you’ll enjoy jars of sweet, ruby-colored delight all year long. Give it a try—you’ll never go back to store-bought again.
PrintHomemade Plum Jelly Recipe: A Sweet Delight for Your Pantry
- Total Time: 4–6 hours (including draining time)
- Yield: 6–7 half-pint jars 1x
Description
A classic homemade plum jelly made from fresh red or purple plums, sweetened with sugar and enhanced with lemon juice and optional spices. Perfect for spreading on toast or gifting.
Ingredients
- 5 pounds of fresh plums (red or purple preferred)
- 1/4 cup lemon juice
- 7 cups granulated sugar
- 1 packet powdered pectin (1.75 oz)
- Optional add-ins: 1 cinnamon stick, 1 vanilla bean, 2–3 whole cloves
Instructions
- Prepare the Fruit: Wash, pit, and chop the plums (no need to peel). Add them to a large pot with about 4 cups of water. Simmer over medium heat for 20–30 minutes, until soft and pulpy.
- Extract the Juice: Pour the cooked plum mixture into a strainer lined with cheesecloth or a jelly bag. Allow it to drip naturally for several hours or overnight—do not squeeze to avoid cloudy jelly.
- Cook the Jelly: Measure 4 cups of the extracted plum juice into a clean pot. Stir in the lemon juice and powdered pectin. Bring to a rolling boil over high heat, stirring constantly.
- Add Sugar and Boil: Add all of the sugar at once, stirring until dissolved. Bring the mixture back to a hard boil and cook for 1–2 minutes. Test for doneness using the sheet test or until temperature reaches 220°F (104°C).
- Jar and Seal: Remove from heat and skim off any foam. Ladle the hot jelly into sterilized jars, leaving 1/4-inch headspace. Wipe rims, apply lids, and screw bands until fingertip tight.
- Water Bath Canning: Place jars in a boiling water bath for 10 minutes. Remove and let cool undisturbed for 12–24 hours. Check seals before storing.
Notes
Optional flavorings like cinnamon, vanilla, or clove can be added to the pot during the juice extraction step. Remove before adding sugar and pectin. Store sealed jars in a cool, dark place for up to 1 year.
- Prep Time: 30 minutes
- Cook Time: 1 hour
- Category: Canning / Preserves
- Method: Water bath canning
- Cuisine: American / Homemade
Nutrition
- Serving Size: 1 tablespoon
- Calories: 50
- Sugar: 13g
- Sodium: 0mg
- Fat: 0g
- Saturated Fat: 0g
- Unsaturated Fat: 0g
- Trans Fat: 0g
- Carbohydrates: 13g
- Fiber: 0g
- Protein: 0g
- Cholesterol: 0mg
Keywords: plum jelly, homemade jam, canning, preserves, plum recipes, water bath jelly