Crispy Japanese Katsu Bowls
Crispy Japanese Katsu Bowls
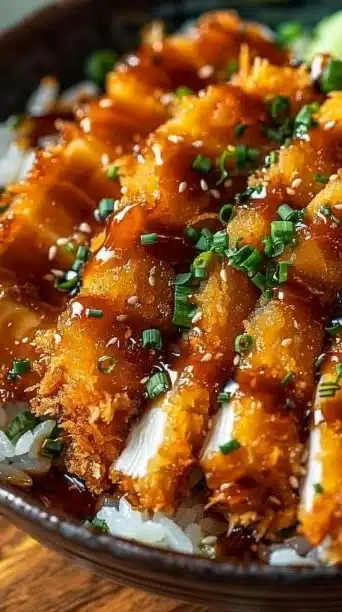
Crispy Japanese Katsu Bowls are a comforting, crunchy rice bowl topped with golden panko-crusted cutlets and a tangy sauce — an easy way to bring Japanese comfort food to your table any night. This friendly version keeps things simple while delivering that satisfyingly crisp texture and savory-sweet tonkatsu drizzle. If you want a slightly different take or more background on homemade versions, take a look at this homemade Japanese katsu bowls recipe for additional inspiration.
Why make this recipe
If you’re tired of the same weeknight dinners and crave something crunchy, flavorful, and bowl-friendly, Crispy Japanese Katsu Bowls are a perfect fix — they’re quick to assemble, endlessly customizable, and deeply satisfying. The contrast between the crisp exterior and tender meat, plus the simple rice base and scallions, makes every bite balanced and comforting.
Step-by-Step Guide to Making Crispy Japanese Katsu Bowls
Ingredients
- 1 cup panko breadcrumbs
- 2 boneless pork chops (or chicken breasts)
- Salt and pepper to taste
- 1/2 cup all-purpose flour
- 1 large egg, beaten
- Oil for frying (neutral oil like canola, vegetable, or peanut)
- Cooked rice, for serving
- Chopped scallions, for garnish
- Tonkatsu sauce, for drizzling
Directions
- Season the pork chops with salt and pepper.
- Dredge each chop in flour, dip in the beaten egg, then coat in panko breadcrumbs.
- Heat oil in a skillet over medium heat. Fry the pork chops until golden brown and cooked through, about 3-4 minutes per side.
- Remove and let rest, then slice.
- Serve the sliced katsu over a bowl of rice, drizzle with tonkatsu sauce, and garnish with scallions.
How this recipe works (what’s happening at each stage)
- Seasoning: Salt and pepper are more than just seasoning; they help bring out the natural flavors of the meat. Season generously but appropriately for the cut you’re using.
- Breading sequence: The classic flour → egg → panko structure creates a dry surface for the egg to adhere, then a sticky layer for the panko to cling to, giving the cutlet an even, crunchy crust.
- Frying: Cooking in hot oil produces immediate steam inside the meat, keeping the center juicy while the outside crisps. The 3–4 minute per side guideline works well for thin pork or pounded chicken; thicker cuts will need a little longer or a lower finish in the oven.
- Resting and slicing: Resting allows juices to redistribute so the final slices remain moist. Thin, even slices make the bowl pleasant to eat and help the katsu soak up a bit of tonkatsu sauce without getting soggy too fast.
Kitchen equipment and small techniques that make a difference
- Use a shallow pan with enough oil to come partway up the sides of the cutlet to ensure even browning.
- Maintain oil around 350°F (175°C) if you have a thermometer; if not, test with a small breadcrumb — it should sizzle and brown within 20–30 seconds.
- Press the panko lightly into the meat to get an even crust, but avoid compacting; airy panko provides the best crunch.
- Let the fried cutlets rest on a wire rack rather than paper towels to keep the bottom crisp.
Serving Suggestions for Crispy Japanese Katsu Bowls
- Classic assembly: a mound of steamed rice, a sliced katsu on top, a drizzle of tonkatsu sauce, and a sprinkle of chopped scallions.
- Add-ons: pickled red cabbage or shredded cabbage slaw for acidity and texture; a soft-cooked egg for richness; steamed or blanched greens like bok choy for color and balance.
- Sauce alternatives: swap tonkatsu for a spicy mayo mix (mayonnaise + sriracha) or a soy-ginger dressing for a different flavor profile.
- For a more balanced bowl, serve with a side of miso soup or a small cucumber sunomono salad.
Best Way to Store Crispy Japanese Katsu Bowls
- Refrigerator: Store katsu and rice separately in airtight containers for up to 3 days at 40°F (4°C) or below.
- Freezer: Wrap cooked katsu tightly and freeze for up to 1 month at 0°F (-18°C) for longer storage; thaw overnight in the fridge before reheating.
- Reheat: For best texture, reheat katsu in a 350°F (175°C) oven on a wire rack for 8–12 minutes until warmed through and crisped; avoid microwaving if you want to keep the crust crunchy.
Tips to make Crispy Japanese Katsu Bowls
Q: How do I keep it moist?
A: Pound the meat to even thickness (about 1/2 inch) so it cooks quickly and evenly; don’t overcook. Rest the cutlets before slicing so juices redistribute.
Q: How do I get extra-crispy coating?
A: Use fresh, coarse panko and fry at the right temperature (around 350°F / 175°C). Cook in batches so the oil temperature doesn’t drop too much.
Q: Can I bake instead of fry?
A: Yes—coat as usual, spray with oil, and bake at 425°F (220°C) on a wire rack for about 15–20 minutes, flipping once, until golden and cooked through. The crunch will be slightly different but still very good.
Variations
- Chicken katsu: Substitute boneless chicken breasts or thighs, pounding them to even thickness for quick cooking. Chicken’s mild flavor pairs beautifully with tonkatsu or spicy mayo. (Bullet)
- Vegetarian option: Use firm tofu slabs, pressed and patted dry, then bread and fry the same way. Tofu soaks up sauces and delivers a satisfying texture. (Paragraph)
Flavor boosters and small substitutions
- Swap panko for gluten-free breadcrumbs and use a cornstarch + water slurry instead of egg for a gluten-free, vegan-friendly version—adjusting cooking time as needed.
- Add a dusting of sesame seeds to the panko for a hint of nuttiness, or mix a little curry powder into the flour for a subtle spice dimension.
Troubleshooting common problems
- Problem: Breading falls off during frying. Solution: Make sure each layer is applied evenly, press panko lightly onto the surface, and let breaded cutlets rest in the fridge for 10–15 minutes before frying to set the coating.
- Problem: Cutlet is soggy after assembling the bowl. Solution: Place rice and any wet toppings under the katsu, not on top, and add the sauce just before serving. Toast the panko-coated cutlet briefly in a hot oven if it loses its crisp before serving.
- Problem: Oil splatters too much. Solution: Dry the meat well, don’t overcrowd the pan, and consider using a splatter screen.
Nutrition and portion notes
- This dish is protein-forward and carbohydrate-rich because of the rice. Use lean cutlets and moderate oil absorption by frying at proper temperature to keep it lighter.
- To reduce calories, bake instead of frying, use brown rice or mixed grains, and serve with a larger portion of vegetables.
Making it ahead and reheating strategy
- Make components ahead: cook rice and make sauce a day ahead; bread the cutlets and refrigerate briefly; fry right before serving for best texture.
- Reheat strategy: For leftovers, reheat only the katsu in a hot oven (350°F / 175°C) on a wire rack to restore crispness while warming through. Reheat rice in the microwave with a damp paper towel covering to retain moisture.
Cultural context and why tonkatsu works so well
Tonkatsu — literally “pork cutlet” — is a beloved Japanese comfort food that found its way into casual dining and home kitchens because of its simplicity and the satisfying contrast of textures. The sweet-savory tonkatsu sauce is a harmonious partner to the breaded cutlet, offering acidity, sweetness, and umami in each drizzle. Building bowls around a single protein and rice is a natural evolution for a weeknight-friendly meal that’s both filling and customizable.
Q&A Section — quick, practical answers
Q: Can I use bone-in chops?
A: Bone-in chops are possible but harder to cook evenly for a bowl format; boneless is recommended for consistent thickness and easier slicing.
Q: What oil is best for frying?
A: Use a neutral, high-smoke-point oil like canola, vegetable, or peanut oil for clean frying and good heat stability.
Q: How do I make tonkatsu sauce at home?
A: A quick mix of ketchup, Worcestershire, soy sauce, and a little sugar or honey approximates tonkatsu; adjust to taste.
FAQs
Q: How long does it take to make this from start to finish?
A: From pounding the meat to plating, plan about 30–40 minutes for two cutlets if you pre-cook rice, or about 45–60 minutes including rice prep.
Q: Is panko necessary?
A: Panko gives the signature airy crunch; traditional breadcrumbs can work but the texture will be denser and less crispy.
Q: Can I assemble bowls in advance for meal prep?
A: Yes—store components separately (rice, katsu, sauce) and assemble right before eating for best texture. If you must combine, keep sauce minimal until serving.
Q: What’s the best way to slice the katsu for a bowl?
A: Slice thinly across the grain on a slight diagonal to make each bite tender and easy to pick up with chopsticks or a fork.
Q: Are there side dishes that pair particularly well?
A: Simple sides like miso soup, cucumber and wakame salad, or pickled vegetables complement the richness of the katsu.
Finishing notes — presentation and pacing
Serve the katsu sliced and fanned over warm rice with a confident drizzle of tonkatsu sauce and a scattering of finely chopped scallions. For a restaurant-style touch, add an onsen (soft) egg just before serving, or a mound of lightly dressed shredded cabbage to add brightness. The bowl format lets you tailor portions and sides for family meals or date-night dinners.
Conclusion
For more inspiration on similar bowls and different topping ideas, check out Half Baked Harvest’s Crispy Chicken Katsu Bowls, which explores variations and plating options. If you’re looking for a fast, customizable approach to katsu bowls with practical tweaks, see The Hungry Waitress’ Chicken Katsu Rice Bowl: Fast, Crispy & Customizable for additional techniques and flavor combos.
Print
Crispy Japanese Katsu Bowls
- Total Time: 45 minutes
- Yield: 4 servings 1x
- Diet: Pork
Description
Crispy Japanese Katsu Bowls are a comforting, crunchy rice bowl topped with golden panko-crusted cutlets and a tangy sauce.
Ingredients
- 1 cup panko breadcrumbs
- 2 boneless pork chops (or chicken breasts)
- Salt and pepper to taste
- 1/2 cup all-purpose flour
- 1 large egg, beaten
- Oil for frying (neutral oil like canola, vegetable, or peanut)
- Cooked rice, for serving
- Chopped scallions, for garnish
- Tonkatsu sauce, for drizzling
Instructions
- Season the pork chops with salt and pepper.
- Dredge each chop in flour, dip in the beaten egg, then coat in panko breadcrumbs.
- Heat oil in a skillet over medium heat. Fry the pork chops until golden brown and cooked through, about 3-4 minutes per side.
- Remove and let rest, then slice.
- Serve the sliced katsu over a bowl of rice, drizzle with tonkatsu sauce, and garnish with scallions.
Notes
For best texture, reheat katsu in a hot oven and keep rice separate until serving.
- Prep Time: 15 minutes
- Cook Time: 30 minutes
- Category: Main Course
- Method: Frying
- Cuisine: Japanese
Nutrition
- Serving Size: 1 serving
- Calories: 450
- Sugar: 6g
- Sodium: 500mg
- Fat: 15g
- Saturated Fat: 3g
- Unsaturated Fat: 10g
- Trans Fat: 0g
- Carbohydrates: 50g
- Fiber: 2g
- Protein: 22g
- Cholesterol: 150mg
Keywords: katsu, Japanese, comfort food, rice bowl, panko, dinner