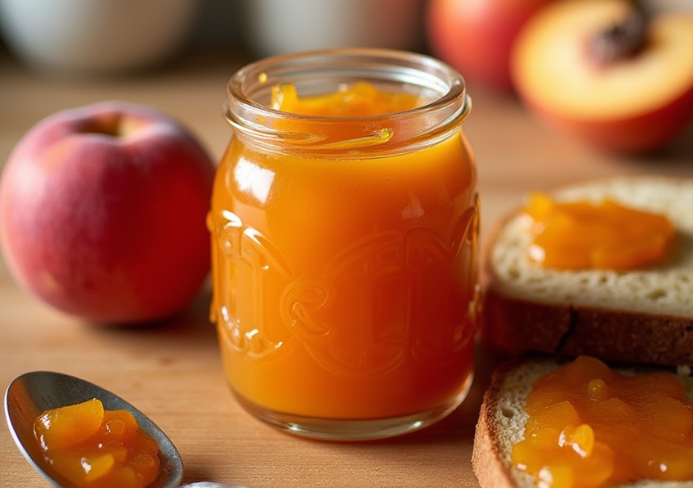
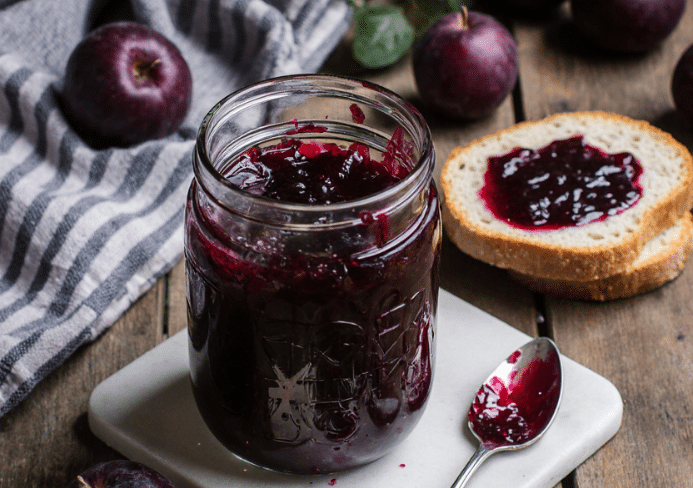
Easy Homemade Plum Jam with Fresh Fruit: A No-Fuss Guide
If you’ve ever dreamed of making your own homemade preserves but were intimidated by the process, this recipe for easy homemade plum jam with fresh fruit is the perfect starting point. With no pectin, no peeling, and just a few simple ingredients, this jam is incredibly flavorful, naturally thickened, and beginner-friendly.
Table of Contents
Whether you’re looking to use up a basket of overripe plums or preserve the taste of summer, this guide walks you through everything you need—from choosing the right fruit to safely canning your jam for long-term storage.
This method follows modern home canning guidelines, which you can find through the National Center for Home Food Preservation. Plus, if you’re curious about why this recipe works so well without pectin, this article from Serious Eats explains the science behind jam-making in simple terms.
Why You’ll Love This Plum Jam
- Uses only two main ingredients: plums and sugar
- No pectin or peeling required
- Naturally thick and delicious with minimal effort
- A perfect gift or pantry staple
- Customizable with flavors like cinnamon or vanilla
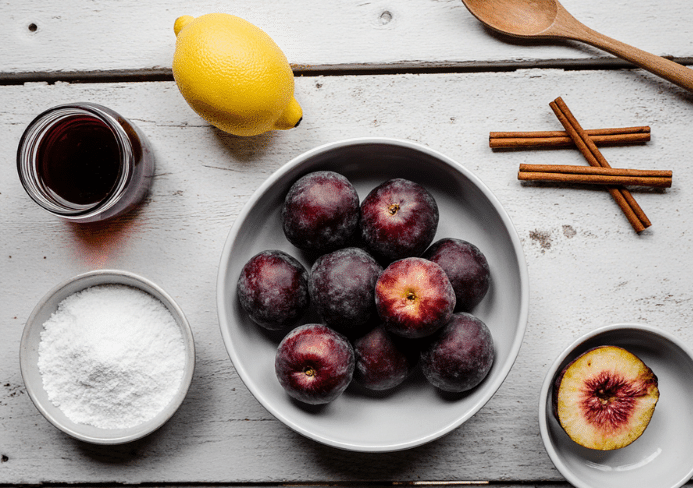
Choosing the Best Plums for Jam
When it comes to making a flavorful plum jam, choosing the right fruit is essential. Look for ripe but firm plums with high natural sugar content. Here are a few of the best varieties:
- Italian prune plums – slightly tart, great texture
- Santa Rosa – sweet and juicy
- Damson plums – dark, rich flavor
- Elephant heart – vibrant and juicy, great color
Make sure the fruit is not overly soft or moldy. Slight bruising is okay since the fruit will break down during cooking.
Ingredients You’ll Need
- 12 lbs of ripe plums (washed, halved, and pitted)
- 4 to 4½ cups granulated sugar (adjust to taste)
- Optional: Lemon juice, cinnamon, cardamom, or vanilla extract
This recipe doesn’t use any added water or pectin. The natural juices and sugars do all the work.
Tools & Equipment Checklist
Before you begin, gather the following tools:
- Large stockpot or Dutch oven
- 8 pint-sized mason jars with new lids
- Jar lifter and canning funnel
- Clean kitchen towels
- Long stirring spoon
- Optional: Immersion blender for smoother texture
You’ll also need a large pot or water-bath canner if you plan to store your jam long-term.
Prepping the Plums
- Wash the plums thoroughly under cold water
- Cut them in half and remove the pits
- Optional: Chop into smaller chunks for faster breakdown during cooking
- Do not peel—the skins will dissolve and enhance flavor
Macerating the Fruit
- Place plums in a large mixing bowl
- Sprinkle sugar over them evenly
- Stir to coat every piece of fruit
- Let them sit at room temperature for 1 hour
- This draws out juice, softens the plums, and starts the preservation process
Cooking the Jam
This method uses a low-and-slow, multi-boil technique to naturally thicken the jam without added pectin.
- Transfer macerated plums and juice into a large pot
- Bring to a gentle boil uncovered, stirring occasionally
- Once it boils evenly, simmer for 10 minutes
- Turn off heat and let the jam cool to room temperature
- Repeat the boiling/simmering/cooling process 4 times
- On the final round, simmer longer if a thicker consistency is desired
- Optional: Use an immersion blender between rounds for a smoother jam
Each round of boiling helps evaporate excess water while concentrating flavor. Be patient—the result is worth it.
Blending Options for Texture
Prefer your jam smooth? Here’s how to do it:
- After the second or third simmer, blend with an immersion blender
- Use a zigzag or “figure-8” pattern for even texture
- Do not over-blend if you want to keep some fruit chunks
- Blend while mixture is still warm but not boiling
Sterilizing and Preparing Jars
Clean jars are essential for safe canning. Here’s how to do it:
- Wash jars and lids in hot, soapy water
- Dry jars in the oven at 215°F (100°C) for 20 minutes
- Boil lids in water for 5 minutes to sterilize
- Use tongs to handle hot jars and lids
Filling and Sealing the Jars
- While jam is hot, ladle it into warm jars using a funnel
- Leave ½ inch headspace at the top of each jar
- Wipe rims with a clean cloth
- Screw lids on firmly but not overly tight
- Air must escape during canning
Water Bath Canning Instructions
- Place jars into a water bath canner or large pot
- Ensure jars are covered with 1–2 inches of water
- Bring to a rolling boil
- Process jars for 15 minutes
- Remove jars and let them sit undisturbed for 12–24 hours
- Listen for the “pop” indicating a vacuum seal
After 24 hours, check that each lid has sealed (it should not flex when pressed). Any unsealed jars should be refrigerated and used within 3 months.
Storing and Shelf Life
- Store sealed jars in a cool, dark place
- Shelf life: Up to 12 months
- Refrigerate after opening
- Label jars with date for tracking freshness
Flavor Variations and Add-Ins
Want to customize your jam? Try adding:
- 1 tsp cinnamon or 1 pod cardamom for warmth
- 1 tsp vanilla extract for mellow sweetness
- 1 tbsp lemon juice or zest for brightness
- 1 cup chopped apple or berries for mix-and-match flavor
Always add flavorings during the final boil.
Common Mistakes to Avoid
- Not simmering long enough – leads to runny jam
- Over-stirring – can introduce air and reduce shelf life
- Skipping sterilization – increases spoilage risk
- Underfilling or overfilling jars – may prevent proper sealing
How to Use Homemade Plum Jam
This versatile fruit spread goes far beyond toast:
- On pancakes, crepes, or waffles
- Swirled into yogurt or oatmeal
- As a tart or cookie filling
- Glazed over pork chops or roasted vegetables
- In PB&J sandwiches with a gourmet twist
FAQs About Homemade Plum Jam
Can you make plum jam without pectin?
Yes! Plums are naturally high in pectin. Long simmering and sugar help the jam set without additives.
Do you have to peel plums for jam?
No. The skins break down during cooking and enhance the flavor and color.
How long does homemade plum jam last?
Sealed and stored properly, up to 1 year. Opened jars should be used within 3–4 weeks.
Can I use frozen plums?
Yes. Thaw and drain excess water before starting.
Why is my jam runny?
It likely didn’t simmer long enough or didn’t reach setting temperature (220°F). You can reboil to thicken.
Can I use monk fruit or honey instead of sugar?
Monk fruit and honey change the flavor and may affect the set. Experiment in small batches first.
Final Tips for Perfect Jam
- Use a candy thermometer to ensure temperature hits 220°F
- Adjust sugar to taste during cooking, not before
- Stir occasionally to avoid scorching
- Don’t rush the process—the longer it simmers, the better it tastes
Making homemade plum jam with fresh fruit is as rewarding as it is delicious. Once you try this method, you may never go back to store-bought jam again. With just plums, sugar, and a little time, you’ll create a beautiful, flavorful jam perfect for gifts or your own pantry.
PrintEasy Homemade Plum Jam with Fresh Fruit: A No-Fuss Guide
- Total Time: 4–5 hours (including maceration and cooling)
- Yield: 8 pint-sized jars (approx. 16 cups) 1x
Description
A naturally thickened, large-batch plum jam made with ripe plums and sugar. Ideal for canning and storing year-round, this recipe uses a repeated simmer-and-cool method to develop rich flavor and consistency without added pectin.
Ingredients
- 12 lbs ripe plums, washed, halved, and pitted (skins left on)
- 4 to 4½ cups granulated sugar (adjust to taste)
- Optional: 1 tsp cinnamon, 1 tsp vanilla extract, 1 tbsp lemon juice
Instructions
- Prepare the Plums: Wash, halve, and pit the plums. Cut into chunks if desired. Leave skins on for flavor and natural pectin.
- Macerate the Fruit: In a large bowl, combine plums and sugar. Stir and let sit at room temperature for 1 hour to draw out juices.
- Cook the Jam (Boil-Simmer-Cool Method): Transfer the fruit mixture to a large stockpot. Bring to a boil uncovered, then reduce to a simmer for 10 minutes. Remove from heat and let cool to room temperature. Repeat this process 3 more times (4 total) to gradually thicken the jam naturally.
- Final Simmer: On the final round, simmer longer if a thicker consistency is desired. Add cinnamon, vanilla, or lemon juice if using. Blend with an immersion blender for a smoother jam if preferred.
- Sterilize the Jars: Wash pint-sized mason jars and lids. Dry jars in a 215°F (100°C) oven for 20 minutes. Boil lids in water for 5 minutes to sterilize.
- Fill and Seal: Ladle hot jam into warm jars using a funnel, leaving ½ inch headspace. Wipe rims clean, apply lids, and screw bands fingertip-tight.
- Water Bath Canning: Submerge sealed jars in a large pot of boiling water (1–2 inches above jar tops) and boil for 15 minutes. Remove and cool undisturbed for 12–24 hours.
- Storage: Once sealed, store jars in a cool, dark place for up to 12 months. Refrigerate after opening and consume within 3–4 weeks.
Notes
This recipe is ideal for preserving large quantities of summer plums. No added pectin is required due to the natural thickening process. Great for gifts or pantry stocking.
- Prep Time: 1 hour 30 minutes
- Cook Time: 2–3 hours (over multiple rounds)
- Category: Jam / Preserves
- Method: Stovetop + Water bath canning
- Cuisine: Homemade / Traditional
Nutrition
- Serving Size: 1 tablespoon
- Calories: 40
- Sugar: 10g
- Sodium: 0mg
- Fat: 0g
- Saturated Fat: 0g
- Unsaturated Fat: 0g
- Trans Fat: 0g
- Carbohydrates: 10g
- Fiber: 0.3g
- Protein: 0g
- Cholesterol: 0mg
Keywords: plum jam, bulk canning, large batch jam, no pectin jam, summer preserves