Healthy Pear Crumble Bars
Healthy Pear Crumble Bars
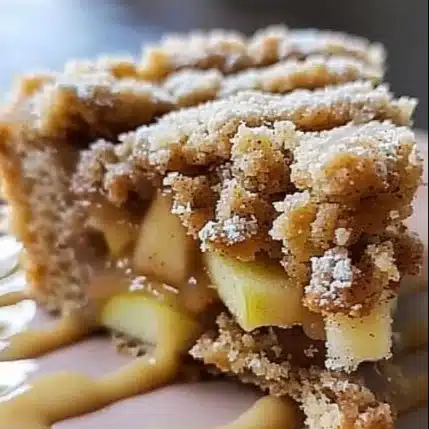
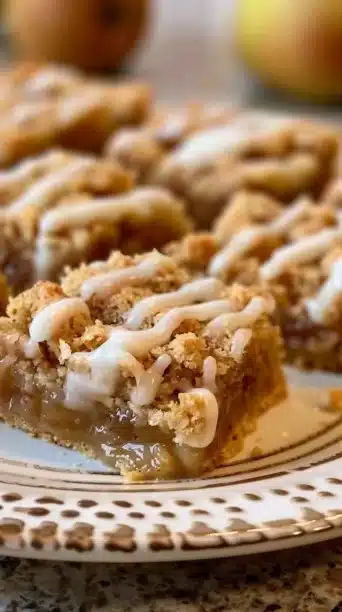
Warm, comforting, and just a touch rustic—these Healthy Pear Crumble Bars balance tender pear filling with a nutty, oat-studded crumble for a dessert that feels like a hug on a plate. They’re naturally sweetened with maple syrup, gluten-free when you use the suggested ingredients, and simple enough for a weekend bake that results in impressive, sliceable bars. If you enjoy fruit-forward bars, you might also like the lovely twist on the idea in this strawberry oatmeal crumble bars recipe.
Why make this recipe
If you’re tired of overly sweet, heavy desserts, this recipe is perfect because it uses pure maple syrup and ripe Bosc pears to give natural sweetness without cloying sugar; the oats and gluten-free flour create satisfying texture while keeping things lighter. It’s a smart option for feeding a crowd—simple to scale up and easy to transport—and it stores and freezes very well so you can enjoy a homemade treat across the week without daily baking.
Step-by-Step Guide to Making Healthy Pear Crumble Bars
Ingredients
- ½ cup coconut oil or butter, melted
- 1 1/3 cups gluten-free all-purpose flour
- 1 cup gluten-free rolled oats
- ¼ cup pure maple syrup (for crumb)
- Pinch sea salt
- 3 large ripe Bosc pears, sliced
- ¼ cup water
- 2 Tbsp pure maple syrup (for filling)
- ½ tsp ground cinnamon
- Pinch ground nutmeg (optional)
- 1 Tbsp gluten-free all-purpose flour (to thicken filling)
- 1 cup powdered sugar (optional glaze)
- 2 Tbsp water or lemon juice (for glaze)
Directions
Prepare Your Baking Pan
Preheat your oven to 375°F (190°C). Line a 9×13-inch baking pan with parchment paper, leaving an overhang on the longer sides for easy removal and clean slices. A parchment sling makes lifting the whole slab simple once the bars are fully cool.Combine Dry Ingredients for Crumb
In a large mixing bowl, whisk together 1 1/3 cups gluten-free all-purpose flour, 1 cup gluten-free rolled oats, ¼ cup pure maple syrup, and a pinch of sea salt. Whisking thoroughly prevents pockets of sweet or salt and gives a uniform base flavor to both crust and topping.Incorporate Wet Ingredients into Crumb
Add ½ cup melted coconut oil or butter to the dry ingredients. Use a fork, pastry blender, or clean fingertips to work the wet ingredients into the dry until the mixture resembles coarse, moist crumbs with some larger clumps forming. Aim for some chunkiness—those clumps give a great texture contrast after baking. Avoid overmixing; you want a loose, crumbly texture rather than a compact dough.Create the Base Layer
Take about two-thirds of the prepared crumb mixture and press it firmly and evenly into the bottom of your parchment-lined baking pan. Use the bottom of a flat-bottomed glass or measuring cup to compact the crumbs into a stable, even base. Set aside the remaining one-third of the crumb mixture for the topping.Prepare the Pears
Peel, core, and dice 3 large ripe Bosc pears into roughly ½-inch pieces. Bosc pears are excellent here because they hold their shape when baked but still soften to a tender, jammy finish. Place the diced pears into a medium-sized mixing bowl.Season the Pears
Add 2 Tbsp pure maple syrup, ¼ cup water, ½ tsp ground cinnamon, and a pinch of ground nutmeg (if using) to the diced pears. Toss gently with a spoon or spatula until each piece is lightly coated—this builds the flavorful juice that will bake into the filling.Thicken the Filling
Sprinkle 1 tablespoon gluten-free all-purpose flour over the seasoned pears and toss again to coat. The flour will help thicken the pear juices released during baking so your bars slice cleanly instead of running.Layer the Filling
Carefully spoon the pear filling evenly over the pressed crumb base in your prepared pan. Spread right to the edges to ensure each bar has an equal fruit-to-crust ratio.Add the Crumble Topping
Sprinkle the reserved one-third of the crumb mixture evenly over the pear filling, leaving some larger clumps where they naturally fall—those clumps make the top beautifully rustic and textural.Bake to Perfection
Place the baking pan in the preheated oven and bake for 35 to 45 minutes, or until the topping is golden brown and the pear filling is bubbly along the edges. If you notice the top getting too dark before the filling is ready, loosely tent the pan with foil for the final 10–15 minutes.Cool Completely
Transfer the pan to a wire rack and let the slab cool completely for 2 to 3 hours (longer is fine). Cooling is crucial: the filling sets as it cools, which enables clean, attractive slices.Lift and Slice
Use the parchment overhangs to lift the entire slab from the pan and place it on a cutting board. Remove the parchment, then slice into 12–16 bars with a sharp knife, wiping the blade between cuts for clean edges.Prepare Optional Glaze
If you like a little sheen and extra sweetness, whisk together 1 cup powdered sugar with 2 Tbsp water or lemon juice until smooth, then drizzle over the cooled bars.Storage and Serving (short note)
Store in an airtight container at room temperature for a few days, refrigerate to keep longer, or freeze individual bars for months. See the Storage section below for full details.
Notes on the method and why each step matters
- Pressing the base firmly creates a stable foundation so bars hold together after cooling.
- Tossing the pears with a small amount of water and maple syrup helps distribute sweetness and prevents the fruit from drying out in the oven.
- The bit of flour in the filling transforms the juices into a glossy, sliceable filling rather than a runny fruit puddle.
- Allowing the slab to cool fully is non-negotiable for tidy slices—rushing this step will yield messy bars.
Keeping Healthy Pear Crumble Bars Fresh
- Room temperature: Store in an airtight container for 3–4 days (keep away from direct sunlight).
- Refrigerator: Keep in a sealed container for up to 7 days; bring to room temperature before serving for best texture.
- Freezer: Wrap individual bars tightly in plastic or foil and place in a freezer-safe bag for up to 2–3 months; thaw at room temperature or warm gently in a low oven.
Best Ways to Serve Healthy Pear Crumble Bars
- Warm from the oven (or gently reheated) with a small scoop of dairy-free vanilla ice cream or classic vanilla for a comforting dessert.
- For a breakfast or brunch option, serve with a dollop of plain or vanilla Greek yogurt and a sprinkle of toasted chopped nuts for crunch.
- Cut into smaller squares and pack in lunchboxes as a wholesome-ish snack—these travel well and are great at room temperature.
Tips to make Healthy Pear Crumble Bars (Q&A style)
Q: How do I keep the crumb topping from getting soggy?
A: Make sure you press the base firmly so it forms a sealed layer; also, don’t overload the filling with extra liquid—Bosc pears release a moderate amount of juice that the single tablespoon of flour will handle. Cooling fully before slicing locks everything into place.
Q: Can I use a different oil or fat?
A: Yes—coconut oil or unsalted butter both work well. Coconut oil keeps the bars dairy-free, while butter adds a richer flavor and slightly crisper topping.
Q: How can I prevent the pears from browning while prepping?
A: Pears brown more slowly than apples, but you can toss cut pears with a teaspoon of lemon juice if you’ll be prepping them significantly ahead of time.
Variations
- Spiced Variation (paragraph): For a warming fall profile, add 1/4 teaspoon ground ginger and 1/8 teaspoon ground cloves to the pear mixture along with the cinnamon. These spices mingle beautifully with maple syrup and give the bars a chai-like warmth without overwhelming the delicate pear flavor.
- Mixed-Fruit Swap (bullet):
- Replace one of the pears with 1 cup diced apples (firm variety like Honeycrisp) for added tartness and a slightly denser filling.
- For a berry twist, fold 1 cup of halved fresh or thawed frozen raspberries into the pears before thickening; reduce added water to 2 Tbsp to compensate for berry moisture.
FAQs
Q: Can I make these bars vegan?
A: Yes — use coconut oil instead of butter and ensure your powdered sugar is bone-char-free if that’s a concern in your diet.
Q: Will regular all-purpose flour work instead of gluten-free?
A: Yes. Substitute equal amounts of regular all-purpose flour in both the crumb and the filling if gluten is not a concern; the texture will be slightly different but still delicious.
Q: How ripe should the pears be?
A: Aim for ripe-but-firm Bosc pears. They should yield slightly to pressure but not be mushy; this ensures they soften in the oven without disintegrating into a puree.
- How can I make these ahead?
- Bake fully, cool, and store in the refrigerator for up to 7 days or freeze individually for quick breakfasts or snacks. Thaw at room temperature before serving.
Additional tips and troubleshooting
- If the topping is browning before the filling is done, tent with foil to avoid burning while the interior finishes baking.
- For cleaner slicing, chill the slab in the fridge for 30–60 minutes after it reaches room temperature—cold bars slice with neater edges.
- If the filling looks too loose after baking, allow more time to cool—the filling firms significantly as it cools.
Nutrition and balance (brief)
These bars are meant to be a healthier take on a classic crumble: maple syrup provides natural sweetness, oats add fiber and chew, and Bosc pears contribute vitamins and a pleasant, juicy texture. Portion control keeps them an appropriate treat as part of a balanced meal plan—pair a single bar with protein-rich yogurt or a handful of nuts to make a more satiating snack.
Final thoughts on technique
The simplicity of this recipe is part of its charm: a straightforward crumb, a gently spiced pear filling, and an optional glaze that’s pure decoration if you want it. Focus on the quality of pears and the evenness of your crumb press, and you’ll be rewarded with bars that are pleasingly sliceable, portable, and shareable.
Conclusion
If you want another pear-forward take that’s similarly wholesome and textured, this Healthy Pear Oatmeal Crumb Bars – The Roasted Root offers a complementary approach with oat-forward crumbs. For a spiced variation that’s vegan and gluten-free and leans into warm chai notes, check out this Chai-Spiced Pear Crumble Bars (Vegan & Gluten-Free) recipe for inspiration and alternative techniques.
Print
Healthy Pear Crumble Bars
- Total Time: 60 minutes
- Yield: 12-16 servings 1x
- Diet: Vegetarian
Description
Warm, comforting bars with a tender pear filling and a nutty, oat-studded crumble, naturally sweetened and gluten-free options available.
Ingredients
- ½ cup coconut oil or butter, melted
- 1 1/3 cups gluten-free all-purpose flour
- 1 cup gluten-free rolled oats
- ¼ cup pure maple syrup (for crumb)
- Pinch sea salt
- 3 large ripe Bosc pears, sliced
- ¼ cup water
- 2 Tbsp pure maple syrup (for filling)
- ½ tsp ground cinnamon
- Pinch ground nutmeg (optional)
- 1 Tbsp gluten-free all-purpose flour (to thicken filling)
- 1 cup powdered sugar (optional glaze)
- 2 Tbsp water or lemon juice (for glaze)
Instructions
- Preheat your oven to 375°F (190°C). Line a 9×13-inch baking pan with parchment paper.
- In a large mixing bowl, whisk together 1 1/3 cups gluten-free all-purpose flour, 1 cup gluten-free rolled oats, ¼ cup pure maple syrup, and a pinch of sea salt.
- Add ½ cup melted coconut oil or butter to the dry ingredients and work the mixture until it resembles coarse crumbs.
- Press about two-thirds of the crumb mixture into the bottom of the lined baking pan.
- Peel, core, and dice the pears, then toss with 2 Tbsp maple syrup, ¼ cup water, ½ tsp cinnamon, and nutmeg.
- Sprinkle 1 Tbsp flour over the pears and mix again to coat.
- Spoon the pear filling onto the crumb base evenly.
- Sprinkle the remaining crumb mixture over the top.
- Bake for 35 to 45 minutes until golden brown and bubbly.
- Cool completely for 2 to 3 hours before slicing into bars.
- If desired, whisk together powdered sugar with 2 Tbsp water or lemon juice for a glaze and drizzle over the bars.
Notes
Cooling the bars completely before slicing is crucial for clean cuts. Store in an airtight container for freshness.
- Prep Time: 15 minutes
- Cook Time: 45 minutes
- Category: Dessert
- Method: Baking
- Cuisine: American
Nutrition
- Serving Size: 1 bar
- Calories: 200
- Sugar: 10g
- Sodium: 120mg
- Fat: 8g
- Saturated Fat: 6g
- Unsaturated Fat: 1g
- Trans Fat: 0g
- Carbohydrates: 28g
- Fiber: 2g
- Protein: 3g
- Cholesterol: 0mg
Keywords: pear crumble bars, healthy dessert, gluten-free, vegan dessert, maple syrup dessert