Homemade Cherry Pie Recipe – A Step-by-Step Guide to the Perfect Classic Dessert
There’s nothing quite like a homemade cherry pie. With its juicy filling, flaky golden crust, and irresistible aroma, this classic dessert is a favorite for good reason. Whether you’re baking for a summer cookout or a cozy holiday meal, this guide will walk you through everything you need to know to make the perfect cherry pie from scratch.
Table of Contents
Unlike store-bought options that often contain preservatives or artificial flavorings, making your own cherry pie lets you control the ingredients and customize it to your taste. Plus, cherries are loaded with nutrients. According to the USDA’s nutrition data, cherries are rich in antioxidants, fiber, and vitamin C, making this indulgent dessert just a bit more justifiable.
And don’t worry if you’ve never made pie crust from scratch. With the right technique, anyone can do it. The King Arthur Baking Company’s pie crust guide is a fantastic resource to understand how to make a flaky crust that doesn’t fall apart.
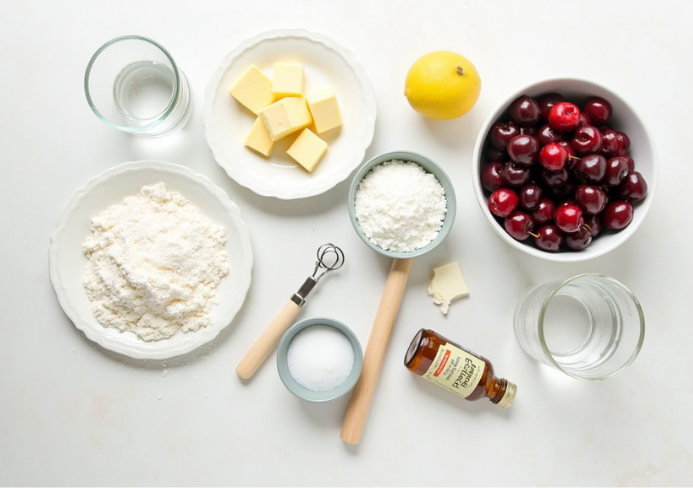
Ingredients Needed
To make the best homemade cherry pie, you’ll need just a few basic ingredients:
For the filling:
- 5 cups of fresh or frozen cherries, pitted
- 3/4 cup granulated sugar
- 1/4 cup cornstarch (or tapioca)
- 1 tablespoon lemon juice
- 1/2 teaspoon almond extract (optional but recommended)
- Pinch of salt
For the crust:
- 2 1/2 cups all-purpose flour
- 1 cup unsalted butter (cold and cubed)
- 1 teaspoon salt
- 1 tablespoon sugar (optional for a hint of sweetness)
- 6-8 tablespoons ice-cold water
Tools & Equipment
Make your baking process easier with the right tools:
- Pie dish (9-inch recommended)
- Rolling pin
- Pastry cutter or food processor
- Cherry pitter (if using fresh cherries)
- Pastry brush (for egg wash)
Choosing the Right Cherries
The type of cherries you use will greatly affect the flavor of your pie.
- Tart cherries (like Montmorency) are traditional and offer that classic balance of sweet and sour.
- Sweet cherries (like Bing or Rainier) can work well but may require less sugar.
- Always taste your fruit before baking and adjust the sugar accordingly.
Frozen cherries are a great alternative when fresh are out of season. Just thaw and drain them before using.
Making the Perfect Cherry Pie Filling
You can make the filling ahead of time or just before baking:
- Cooked Filling Method: Combine cherries, sugar, cornstarch, lemon juice, and salt in a saucepan. Cook over medium heat until the mixture thickens and becomes glossy.
- Raw Filling Method: Mix ingredients in a bowl and let it sit for 10–15 minutes. This method gives the pie a fresher fruit texture but can be slightly runnier.
Cornstarch is a common thickener, but tapioca starch or flour are good alternatives. Be sure to let the pie cool fully before slicing so the filling sets properly.
Crafting the Flakiest Pie Crust
Making pie crust is easier than you think!
- Combine flour, salt, and sugar (if using).
- Cut in the cold butter using a pastry cutter or food processor until the mixture resembles coarse crumbs.
- Add ice water a tablespoon at a time until the dough comes together.
- Divide the dough in half, wrap in plastic wrap, and chill for at least 1 hour.
Roll out one half for the bottom crust and the other for a lattice or full top crust. A lattice top is beautiful and allows steam to escape during baking.
Assembling & Baking the Pie
- Preheat your oven to 400°F (200°C).
- Roll out the bottom crust and place it in your pie dish.
- Pour in the cherry filling and dot with a few cubes of butter for extra richness.
- Cover with a lattice or full top crust. Trim and crimp the edges.
- Brush with an egg wash and sprinkle with sugar for a golden finish.
- Bake for 20 minutes at 400°F, then reduce heat to 350°F and bake for another 30–35 minutes until bubbling.
Use a pie shield or foil around the crust edge if it starts to brown too quickly.
Cooling and Serving Tips
Patience pays off! Let your pie cool for at least 3–4 hours to allow the filling to fully set. This prevents a runny slice.
- Serve with whipped cream or vanilla ice cream
- Enjoy warm, at room temperature, or chilled
Storing and Freezing Cherry Pie
- Store leftovers at room temperature for 1–2 days or in the fridge for up to 5 days.
- Wrap tightly and freeze for up to 3 months.
- To freeze an unbaked pie, assemble it in a freezer-safe dish, wrap well, and bake from frozen by adding 20–25 extra minutes to the cook time.
For more on freezing techniques, visit The Kitchn’s guide to freezing fruit pies.
Troubleshooting Common Problems
- Runny filling? You may need more thickener or didn’t cool long enough.
- Soggy crust? Try blind baking the bottom crust or baking on a pizza stone.
- Burnt edges? Use foil or a pie shield.
- Cracked top crust? Keep dough chilled and handle it minimally.
Variations and Customizations
Want to make it your own? Try these variations:
- Add a cup of blueberries or raspberries for a mixed berry pie.
- Mix in a tablespoon of cherry liqueur for an adult twist.
- Make mini cherry pies using a muffin tin for easy serving.
- Use vegan butter and a flax egg for a vegan-friendly pie.
- Swap all-purpose flour for gluten-free flour if needed.
FAQs – People Also Ask
What is the best thickener for cherry pie?
Cornstarch is reliable, but tapioca or flour also work well.
Should I cook the cherries before baking?
You can cook the filling for a smoother texture or use raw cherries for a more rustic feel.
Can I use canned cherries for cherry pie?
Yes, but use unsweetened canned cherries and adjust sugar levels.
How do you keep a cherry pie from being runny?
Use the right thickener, don’t overfill, and allow time to cool completely.
Can I make cherry pie with frozen cherries?
Absolutely. Just thaw and drain before mixing with other ingredients.
Conclusion
A homemade cherry pie is more than just dessert—it’s a labor of love. With juicy, vibrant filling and a buttery crust, it’s the perfect sweet to impress your family and friends. By choosing the right cherries, following the proper baking steps, and giving the pie enough time to cool, you’ll get a slice that’s bursting with flavor and beauty.
Give this recipe a try, experiment with your own twist, and make cherry pie a tradition in your home.
PrintHomemade Cherry Pie Recipe – A Step-by-Step Guide to the Perfect Classic Dessert
- Total Time: 4 hours 35 minutes (including cooling)
- Yield: 1 9-inch pie (8 slices) 1x
- Diet: Vegetarian
Description
A classic cherry pie with a buttery, flaky homemade crust and a juicy cherry filling. Perfect for summer gatherings or cozy holiday tables. Can be made with fresh or frozen cherries and finished with a beautiful lattice top.
Ingredients
- For the Filling:
- 5 cups fresh or frozen cherries, pitted
- 3/4 cup granulated sugar
- 1/4 cup cornstarch (or tapioca)
- 1 tablespoon lemon juice
- 1/2 teaspoon almond extract (optional)
- Pinch of salt
- For the Crust:
- 2 1/2 cups all-purpose flour
- 1 cup unsalted butter (cold and cubed)
- 1 teaspoon salt
- 1 tablespoon sugar (optional)
- 6–8 tablespoons ice-cold water
- Optional for assembly: Egg wash, sugar for sprinkling, butter for dotting
Instructions
- Make the Crust: In a large bowl, whisk flour, salt, and sugar. Cut in cold cubed butter using a pastry cutter or fork until mixture resembles coarse crumbs. Add ice-cold water 1 tablespoon at a time until dough comes together. Divide in two, shape into discs, wrap in plastic, and chill for 1 hour.
- Prepare the Filling: In a bowl, combine cherries, sugar, cornstarch, lemon juice, almond extract (if using), and salt. You can either cook this mixture in a saucepan until thickened or let it sit raw for a more rustic filling.
- Assemble the Pie: Preheat oven to 400°F (200°C). Roll out one dough disc for the bottom crust and transfer to a 9-inch pie dish. Fill with cherry mixture and dot with a few small pieces of butter. Roll out the second dough disc for the top crust—either full or lattice-style. Seal and crimp the edges. Brush the top with egg wash and sprinkle with sugar.
- Bake: Bake at 400°F for 20 minutes, then reduce oven temperature to 350°F (175°C) and bake an additional 30–35 minutes until golden brown and bubbling.
- Cool: Let the pie cool for 3–4 hours at room temperature before slicing. This allows the filling to set.
Notes
Best served with whipped cream or vanilla ice cream. For extra shine, brush the crust with a simple syrup after baking.
- Prep Time: 40 minutes
- Cook Time: 55 minutes
- Category: Dessert
- Method: Baking
- Cuisine: American
Nutrition
- Serving Size: 1 slice
- Calories: 390
- Sugar: 22g
- Sodium: 230mg
- Fat: 22g
- Saturated Fat: 13g
- Unsaturated Fat: 8g
- Trans Fat: 0g
- Carbohydrates: 45g
- Fiber: 3g
- Protein: 4g
- Cholesterol: 60mg
Keywords: cherry pie, homemade pie crust, summer dessert, lattice pie, fruit pie