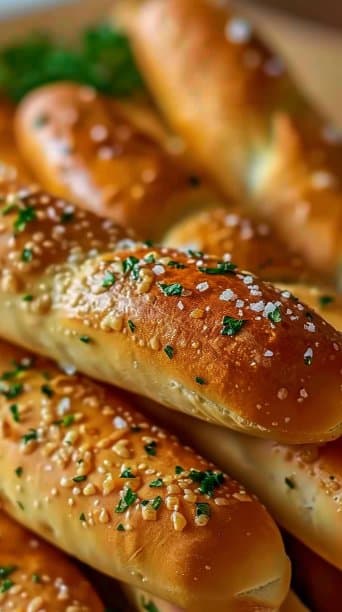
Homemade Olive Garden Breadsticks: Warm, Buttery & Irresistible!
Homemade Olive Garden Breadsticks: Warm, Buttery & Irresistible!
These soft, garlicky breadsticks recreate the cozy, savory experience you get at Olive Garden — but from your own kitchen. They’re simple to make, comforting to eat, and perfect for serving with pasta, soup, or a simple salad. For another easy crowd-pleaser dessert recipe you might like to pair with dinner, check out this churro cookies recipe.
Why make this recipe
If you’re tired of buying store-bought bread that’s dry, flavorless, or never warm enough, this recipe is perfect because it yields soft, buttery breadsticks with a crisp golden exterior and a tender, pillowy interior. They’re impressively close to the Olive Garden original but made with pantry staples, so you can enjoy restaurant-style breadsticks at home any night of the week. Plus, making them yourself lets you control the garlic-butter intensity and add personal twists like herbs or cheesy finishes.
Ingredients
- 1 ½ cups warm water (110°F)
- 2 ¼ teaspoons active dry yeast (1 standard packet)
- 1 tablespoon granulated sugar, plus a pinch
- 1 teaspoon salt
- 4 cups all-purpose flour
- 2 tablespoons olive oil, plus more for greasing
- ½ cup unsalted butter, melted
- 1–2 teaspoons garlic powder
- Pinch of salt (optional, for topping)
Step-by-Step Guide to Making Homemade Olive Garden Breadsticks
Activate Yeast
In a large bowl combine 1 ½ cups warm water (about 110°F), 2 ¼ teaspoons active dry yeast, and a pinch of granulated sugar. Let the mixture sit for 5–10 minutes until a frothy layer forms on top. This bloom indicates the yeast is active — if it doesn’t foam after 10 minutes, the yeast may be old; start over with fresh yeast and warm water.Prepare Dough
To the activated yeast, add the remaining 1 tablespoon granulated sugar, 1 teaspoon salt, and 2 tablespoons olive oil. Stir to combine. Gradually add 4 cups all-purpose flour, mixing with a wooden spoon or your mixer until a shaggy dough forms and starts to pull away from the sides of the bowl. The dough should be soft but slightly tacky; adjust with a tablespoon or two of flour if it’s overly sticky.Knead Dough
Turn the dough out onto a lightly floured surface and knead by hand for 10–12 minutes until smooth and elastic, or use a stand mixer fitted with a dough hook on medium-low speed for 7–10 minutes. Proper kneading develops gluten and gives the breadsticks structure; you’ll know it’s ready when the dough springs back when poked.First Rise (Proofing)
Lightly grease a large, clean bowl with olive oil. Place the dough in the bowl, turning it once to coat all sides with oil. Cover tightly with plastic wrap or a clean kitchen towel, and let rise in a warm, draft-free spot for 1 to 1 ½ hours, or until doubled in size. A good rise gives the bread a light, airy texture.Shape Breadsticks
Gently punch down the risen dough and turn it out onto a lightly floured surface. Divide the dough into 16–20 equally sized pieces, depending on how thick or thin you like your breadsticks. Roll each piece into a 6–8 inch long rope about ½–¾ inch thick. Place the shaped breadsticks about 1 inch apart on parchment paper–lined baking sheets to allow room for the second rise.Second Rise & Preheat Oven
Lightly cover the shaped breadsticks with a clean towel and let them rise again in a warm spot for 30–45 minutes, until visibly puffy. During the last 15 minutes of this rise, preheat your oven to 375°F (190°C) so it’s fully up to temperature when the breadsticks go in.Bake Breadsticks
Bake the breadsticks for 12–15 minutes, or until they’re a beautiful golden brown on top and bottom. Rotate the trays halfway through if your oven bakes unevenly. The top should be golden and the bottoms should have a light crispness.Apply Garlic Butter Topping
While the breadsticks bake, melt ½ cup unsalted butter and stir in 1–2 teaspoons garlic powder and an optional pinch of salt. As soon as the breadsticks come out of the oven, generously brush the tops and sides with the melted garlic butter. This step is what gives the breadsticks their signature glossy, garlicky finish; don’t be shy with the butter.Serve
Serve your homemade Olive Garden breadsticks warm alongside your favorite sauces, soups, or salads. Store any leftovers in an airtight container at room temperature for up to 2–3 days; reheat in a 350°F (175°C) oven for 5–7 minutes to refresh the crust and buttered topping.
Best Way to Store Homemade Olive Garden Breadsticks
- Short term (room temperature): Store in an airtight container or resealable bag for 2–3 days.
- Longer term (freezer): Wrap cooled breadsticks individually in plastic wrap and place in a freezer bag for up to 2 months. Reheat frozen breadsticks in a 350°F (175°C) oven for 10–12 minutes (cover loosely if they’re browning too much).
- Reheating temperature and time: 350°F (175°C) for 5–7 minutes for refrigerated; 10–12 minutes for frozen.
Serving Ideas for Homemade Olive Garden Breadsticks
- Classic pairing: Offer them alongside spaghetti, fettuccine Alfredo, or lasagna for a restaurant-style meal at home.
- Dipping options: Serve with warmed marinara, garlic butter, pesto, or a creamy spinach-artichoke dip.
- Party platter: Arrange breadsticks in a basket with small bowls of seasoned olive oil, balsamic reduction, and grated Parmesan for dipping and grazing.
- Build-a-breadstick bar: Provide grated cheeses, chopped herbs, red pepper flakes, and flavored salts for guests to customize their breadstick experience.
Tips to make Homemade Olive Garden Breadsticks
- Use warm water (110°F): Too hot will kill the yeast; too cool will delay rising.
- Don’t skimp on kneading: Proper gluten development gives the breadsticks their airy chew.
- Brush immediately after baking: The garlic butter soaks in best when the breadsticks are still hot.
- Make ahead option: You can shape and chill the dough overnight in the fridge; let it come to room temperature and rise before baking.
- Uniform sizing: Use a kitchen scale or measure dough pieces to ensure even baking.
Variations
- Cheesy garlic breadsticks: Before the second rise, brush the shaped sticks lightly with olive oil and sprinkle with shredded mozzarella and grated Parmesan; bake as directed. The cheese will melt and create a golden, bubbly crust.
- Herb-infused butter: Mix fresh chopped rosemary, thyme, or parsley into the melted butter for a fragrant, garden-fresh twist. Add a squeeze of lemon for brightness.
FAQs
Q: Can I use instant yeast instead of active dry yeast?
A: Yes. If using instant (rapid-rise) yeast, you can mix it directly with the dry ingredients and omit the bloom step, but still use the same quantity. Expect a slightly faster rise.
Q: What if my dough is too sticky to handle?
A: Lightly flour your hands and the work surface, but add flour sparingly — too much flour makes the breadsticks dense. Aim for a tacky-but-not-sticky dough.
Q: Can I prepare these in a bread machine?
A: Yes, you can use a bread machine on the dough cycle to mix and knead. Remove the dough after the cycle, shape into breadsticks, and continue with the second rise and baking.
Q: How do I make them crispier?
A: Bake on a preheated baking stone or heavy baking sheet, and avoid covering the breadsticks tightly while cooling. A light egg wash before baking can also increase browning.
Q: Are these freezer-friendly?
A: Absolutely. Bake and cool the breadsticks, then wrap individually and freeze up to 2 months. Reheat directly from frozen in the oven at 350°F (175°C) for about 10–12 minutes.
Variation (comparison-style)
- Plain vs. Parmesan-crusted: Plain breadsticks are the easiest and most reminiscent of the Olive Garden classic; Parmesan-crusted adds a salty, umami crunch that pairs well with tomato-based sauces.
Frequently asked (bold-style)
How long should I let the dough rise?
Let the dough rise until doubled in size — typically 1 to 1 ½ hours for the first rise and 30–45 minutes for the second, depending on room temperature.
Can I skip the second rise?
It’s not recommended. The second rise gives the breadsticks their light, airy interior; skipping it will result in denser breadsticks.
Conclusion
These homemade Olive Garden breadsticks bring restaurant nostalgia straight to your table with soft interiors, buttery garlic flavor, and a golden finish. If you’d like to compare techniques or try another popular copycat version, this Handle the Heat copycat Olive Garden breadsticks recipe offers a tested alternative. For a slightly different take and additional step-by-step photos, check out the This Gal Cooks Olive Garden breadsticks copycat recipe.
Enjoy baking — and more importantly — enjoy sharing these warm, buttery breadsticks with family and friends!
Print
Homemade Olive Garden Breadsticks
- Total Time: 105 minutes
- Yield: 16-20 servings 1x
- Diet: Vegetarian
Description
Soft, buttery breadsticks that recreate the cozy experience of Olive Garden, perfect for serving with pasta, soup, or salad.
Ingredients
- 1 ½ cups warm water (110°F)
- 2 ¼ teaspoons active dry yeast (1 standard packet)
- 1 tablespoon granulated sugar, plus a pinch
- 1 teaspoon salt
- 4 cups all-purpose flour
- 2 tablespoons olive oil, plus more for greasing
- ½ cup unsalted butter, melted
- 1–2 teaspoons garlic powder
- Pinch of salt (optional, for topping)
Instructions
- In a large bowl, combine warm water, yeast, and a pinch of sugar. Let sit for 5–10 minutes until frothy.
- Add sugar, salt, and olive oil to the yeast mixture. Gradually stir in flour until a shaggy dough forms.
- Knead dough on a floured surface for 10–12 minutes until smooth or use a mixer for 7–10 minutes.
- Lightly grease a bowl, place dough inside, and cover. Let rise for 1 to 1 ½ hours until doubled in size.
- Gently punch down dough and divide into 16–20 pieces. Roll into 6–8 inch ropes and place on parchment-lined baking sheets.
- Cover breadsticks and let rise for another 30–45 minutes. Preheat oven to 375°F (190°C).
- Bake for 12–15 minutes until golden brown. Rotate trays halfway through baking.
- Melt butter, stir in garlic powder, and brush over breadsticks immediately after baking.
- Serve warm with sauces, soups, or salads. Store leftovers in an airtight container.
Notes
For a cheesy variation, sprinkle with mozzarella and Parmesan before the second rise. Store in the freezer for up to 2 months.
- Prep Time: 30 minutes
- Cook Time: 15 minutes
- Category: Bread
- Method: Baking
- Cuisine: Italian
Nutrition
- Serving Size: 1 breadstick
- Calories: 180
- Sugar: 1g
- Sodium: 200mg
- Fat: 8g
- Saturated Fat: 4g
- Unsaturated Fat: 4g
- Trans Fat: 0g
- Carbohydrates: 24g
- Fiber: 1g
- Protein: 3g
- Cholesterol: 15mg
Keywords: Olive Garden breadsticks, homemade breadsticks, garlic breadsticks, Italian bread