Mulberry Earl Grey Cheesecake
Mulberry Earl Grey Cheesecake
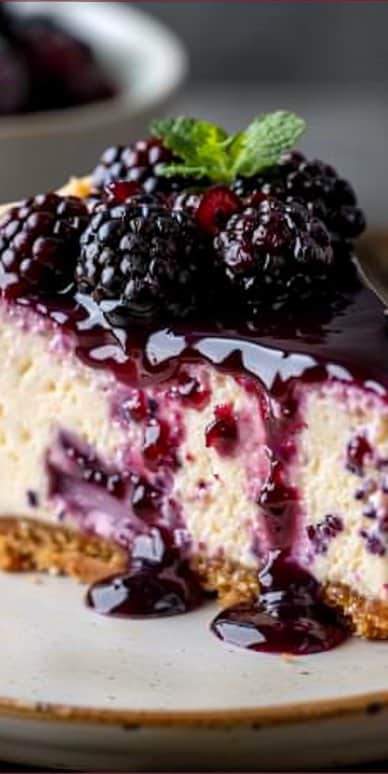
Imagine a velvety cheesecake that combines the delicate floral notes of Earl Grey tea with the sweet, tangy burst of fresh mulberries. Sounds delightful, doesn’t it? This Mulberry Earl Grey Cheesecake is not just a dessert; it’s a sensory experience that transports you to a cozy tea room on a sunny afternoon. Perfect for gatherings, celebrations, or a sweet treat to enjoy at home, this cheesecake will surely leave your guests in awe.
Why Make This Recipe
- Its unique flavor profile blends the luxurious richness of cheesecake with the aromatic complexity of Earl Grey and the fruity brightness of mulberries.
- The stunning marbled swirl creates an eye-catching presentation that is as pleasing to the eyes as it is to the palate.
- This dessert can be prepared a day in advance, making it a stress-free option for entertaining.
Making Mulberry Earl Grey Cheesecake at Home
Creating this cheesecake is a step-by-step journey, beginning with preparing the crust and ending with a moment of patience as it chills overnight. Let’s walk through each stage together so you can make a masterpiece in your kitchen.
Prepare Your Workspace and Ingredients
Start by gathering all your ingredients. Make sure the cream cheese and eggs are at room temperature for that silky texture. Remember, you will need a 9-inch springform pan, baking parchment, aluminum foil, and a delicious amount of patience as the oven works its magic. Preheat the oven to 160°C (325°F), and have a kettle or pot of hot water ready for the water bath.
Prepare Springform Pan
Take your greased 9-inch springform pan and cut a circle of baking parchment to snugly fit the bottom. Wrap the pan’s exterior tightly with two layers of heavy-duty aluminum foil. This prevents pesky water from leaking into your crust during the baking process.
Crush Biscuits for the Crust
Place 200g of digestive biscuits (or graham crackers, if you prefer) into a food processor. Blend until you achieve a fine crumb consistency. Alternatively, if you wish to use your own muscle power, place the biscuits in a zip-top bag and crush them with a rolling pin.
Infuse the Crust with Earl Grey
For an extra hint of sophistication, consider adding 1 teaspoon of finely ground Earl Grey tea leaves to your crushed biscuits. This step is optional, but it will certainly enhance the aromatic flavor of your crust.
Combine Crust Ingredients
In a medium-sized bowl, mix your crushed biscuits (tea leaves included if using), 2 tablespoons of granulated sugar, and the melted 50g of unsalted butter. Stir until the mixture resembles wet sand and every crumb is moistened.
Press the Crust
Pour the biscuit mixture into the prepared springform pan. Using the bottom of a flat glass or a measuring cup, press firmly and evenly into the bottom of the pan to create a solid crust for your cheesecake.
Bake the Crust
Pop the crust in your preheated oven and let it bake for about 10 minutes. While it bakes, enjoy the sweet aroma wafting through your kitchen. Once finished, remove from the oven and set aside to cool completely on a wire rack.
Prepare the Mulberry Swirl Base
Now, it’s time for the fruity layer. In a small saucepan, combine 200g of mulberries, 50g of granulated sugar, and 1 tablespoon of fresh lemon juice. Stir occasionally over medium heat until the berries soften and the mixture becomes syrupy, about 5 to 7 minutes.
Thicken the Mulberry Swirl
To elevate your swirl, whisk together 1 teaspoon of cornstarch with 1 tablespoon of cold water to form a slurry. Slowly pour this into the simmering mulberry mixture, stirring continuously. Cook for an additional 1 to 2 minutes until thickened. Transfer the mixture to a small bowl and allow it to cool.
Prepare the Earl Grey Cream
Gently heat 120ml of heavy cream in a small saucepan until it begins to simmer—watch closely to avoid boiling. Once you see bubbles forming at the edges, remove it from heat and add in 2 Earl Grey tea bags or 2 teaspoons of loose leaf tea. Stir gently to ensure it’s submerged and cover with a lid or plastic wrap. Let it steep for 15 to 20 minutes (or up to 30 minutes for a stronger flavor).
Strain and Chill Earl Grey Cream
Once steeping is complete, remove the tea bags or strain out the loose tea. Cool the infused cream in a clean bowl and place it in the refrigerator until fully chilled. This step is vital because the cool cream helps create a smooth batter for your cheesecake.
Cream the Cream Cheese
In a large mixing bowl, use an electric mixer with the paddle attachment to beat 700g of softened full-fat cream cheese on medium-low for about 2 to 3 minutes. You want it to be incredibly smooth and lump-free; this is essential for a perfect cheesecake.
Add Sugar Gradually
Next, gradually add in 200g of granulated sugar, continuing to mix on low speed until everything is just combined and smooth. Remember to scrape down the sides of the bowl frequently, and mix for another 2 minutes until it’s light and fluffy.
Incorporate Eggs and Yolk
Add your 3 large eggs, one at a time, beating each into the mixture at very low speed. After incorporating the eggs, add in 1 large egg yolk. It’s crucial to mix just until combined to avoid overmixing, which can lead to cracks in your cheesecake.
Add Vanilla and Earl Grey Cream
Gently fold in 1 teaspoon of pure vanilla extract, then pour in your chilled Earl Grey cream. Mix on the lowest speed just until everything is fully combined, which should create a beautifully homogenous batter.
Layer the Batter & Swirl
Begin by pouring half of your cheesecake batter over the cooled biscuit crust. Spread it evenly, and then dollop half of the cooled mulberry swirl over this layer. With a butter knife or skewer, gently swirl the mulberry mixture into the batter. Don’t overdo it; you want those lovely ribbons to show.
Carefully pour the remaining cheesecake batter over your first swirled layer, spreading gently. On top, dollop the rest of the mulberry swirl and swirl once more to create an elegant design.
Prepare the Water Bath
This step may seem a bit extra, but it’s necessary for a creamy, crack-free cheesecake. Place your foil-wrapped springform pan inside a larger roasting pan. Carefully pour hot water into the roasting pan until it reaches halfway up the sides of the springform pan. This water bath ensures even baking and moisture.
Bake the Cheesecake
Transfer the roasting pan with your cheesecake to the preheated oven. Bake for 60 to 75 minutes. The edges will set, but the center should still have a slight wobble. It will firm up as it cools.
Cool in the Oven
After baking, turn off the oven but keep the cheesecake inside with the door slightly ajar. Let it cool gradually in this environment for about an hour. This method helps prevent cracks from sudden temperature changes.
Cool at Room Temperature
Once the hour is up, carefully remove the roasting pan from the oven. Take your springform pan out of the water bath and place it on a wire rack. Remove the aluminum foil and let the cheesecake cool entirely at room temperature for 1 to 2 hours.
The All-Important Chill
After cooling, cover the springform pan loosely with plastic wrap and refrigerate the cheesecake for at least 6 to 8 hours, or preferably overnight. This chilling time is crucial; it allows the cheesecake to set and enhances the flavors.
Unmolding the Cheesecake
When the cheesecake is fully chilled, loosen its edges by running a thin knife or an offset spatula around the inside. Unlatch the springform ring and carefully slide the cheesecake off its base or leave it on the bottom for serving.
Garnish Before Serving
For an eye-catching presentation, arrange fresh mulberries artfully on top of your cheesecake. If you’re feeling fancy, finely grind a small amount of Earl Grey tea leaves and dust the top gently. A few fresh mint leaves will also add a pop of color and flair.
Slice and Serve
To serve, use a sharp knife, wiping the blade with a hot, damp cloth between slices to maintain clean cuts. Voila! You have now created a stunning Mulberry Earl Grey Cheesecake sure to impress all your guests.
Storage Tips for Mulberry Earl Grey Cheesecake
To keep your cheesecake fresh for as long as possible, follow these guidelines:
- Refrigerate for up to 3 to 4 days at 40°F (4°C)
- Freeze for up to 2 months for longer storage (be sure to wrap tightly to avoid freezer burn)
- Allow to thaw in the fridge overnight before serving after freezing
Serving Suggestions for Mulberry Earl Grey Cheesecake
This Mulberry Earl Grey Cheesecake is delightful on its own but can be paired or garnished with various accompaniments for a more dynamite presentation:
- Fresh Berries: Serve with a side of extra mulberries or mixed berries for added freshness.
- Whipped Cream: A dollop of lightly sweetened whipped cream can enhance the rich flavors and provide an exciting texture contrast.
- Chocolate Drizzle: For chocolate lovers, a light drizzle of dark chocolate ganache can make for a delicious pairing.
- Tea Pairing: Complement the cheesecake with a cup of Earl Grey tea for a sophisticated afternoon treat.
Tips to Make Mulberry Earl Grey Cheesecake
- Room Temperature Ingredients: Always ensure your cream cheese and eggs are at room temperature for a seamless batter. This helps prevent lumps and contributes to a creamier texture.
- Avoiding Cracks: To minimize the risk of cracks, do not overmix the batter once the eggs are added, and always use a water bath during baking.
- Chill Thoroughly: Allow the cheesecake to chill for the recommended time after baking to achieve the perfect consistency.
Variations or Substitutions
If you want to experiment with flavors or have dietary restrictions, these options could help:
- Different Fruit: If mulberries are out of season or unavailable, consider using raspberries or blueberries for a similar yet distinct flavor and texture.
- Tea Alternatives: For a twist, try using chai tea or green tea instead of Earl Grey for a unique flavor that also brings a lively color change to the cheesecake.
FAQs
Q: Can I make this cheesecake ahead of time?
A: Absolutely! This cheesecake can be made up to two days in advance. Just be sure to store it properly in the refrigerator.
Q: How do I keep the cheesecake from cracking?
A: Make sure to avoid overmixing after adding the eggs, and always bake using a water bath for consistent moisture and heat.
Q: Is there a way to make this cheesecake without eggs?
A: Yes, you can use egg substitutes like flax eggs or chia eggs, but the texture will differ slightly. You might also explore recipes that cater to egg-free diets.
With its rich, creamy texture, the floral elegance of Earl Grey, and a perfect sweet-tart balance from the mulberries, this Mulberry Earl Grey Cheesecake is a dessert worth savoring. The complex layers of flavor and stunning presentation make it a standout choice for any occasion, and once you slice into it, you’ll delight in the beautiful swirl of colors and textures. Treat yourself and others to this incredible indulgence that beautifully marries classic flavors with a modern twist. Enjoy every bite!
Print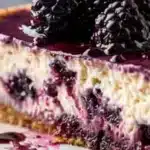
Mulberry Earl Grey Cheesecake
- Total Time: 105 minutes
- Yield: 12 servings 1x
- Diet: Vegetarian
Description
A velvety cheesecake that combines the delicate floral notes of Earl Grey tea with the sweet, tangy burst of fresh mulberries, perfect for any gathering.
Ingredients
- 200g digestive biscuits (or graham crackers)
- 50g unsalted butter, melted
- 2 tablespoons granulated sugar
- 1 teaspoon finely ground Earl Grey tea leaves (optional)
- 200g mulberries
- 50g granulated sugar
- 1 tablespoon fresh lemon juice
- 1 teaspoon cornstarch
- 120ml heavy cream
- 2 Earl Grey tea bags (or 2 teaspoons loose leaf tea)
- 700g full-fat cream cheese, softened
- 200g granulated sugar
- 3 large eggs
- 1 large egg yolk
- 1 teaspoon pure vanilla extract
- Fresh mulberries for garnish
- Mint leaves for garnish
Instructions
- Preheat oven to 160°C (325°F) and prepare a 9-inch springform pan.
- Crush the digestive biscuits in a food processor or zip-top bag and mix with sugar and melted butter.
- Press the mixture into the prepared springform pan and bake for 10 minutes.
- Prepare the mulberry swirl by cooking mulberries with sugar and lemon juice until syrupy.
- Thicken the mulberry mixture with cornstarch slurry and let cool.
- Infuse heavy cream with Earl Grey tea, let steep, and cool.
- Beat cream cheese, gradually add sugar, then mix in eggs and yolk until combined.
- Fold in vanilla and chilled Earl Grey cream.
- Layer half the cheesecake batter, swirl with half the mulberry mixture, pour remaining batter and swirl again.
- Prepare a water bath and bake the cheesecake for 60-75 minutes.
- Cool in the oven for 1 hour, then at room temperature for 1-2 hours.
- Refrigerate overnight before serving.
- Garnish with fresh mulberries and mint leaves before slicing and serving.
Notes
Be sure to use room temperature ingredients for a smooth batter and avoid overmixing after adding eggs to prevent cracks.
- Prep Time: 30 minutes
- Cook Time: 75 minutes
- Category: Dessert
- Method: Baking
- Cuisine: Fusion
Nutrition
- Serving Size: 1 slice
- Calories: 410
- Sugar: 25g
- Sodium: 350mg
- Fat: 28g
- Saturated Fat: 12g
- Unsaturated Fat: 14g
- Trans Fat: 0g
- Carbohydrates: 39g
- Fiber: 1g
- Protein: 6g
- Cholesterol: 110mg
Keywords: cheesecake, Earl Grey, dessert, mulberry, tea