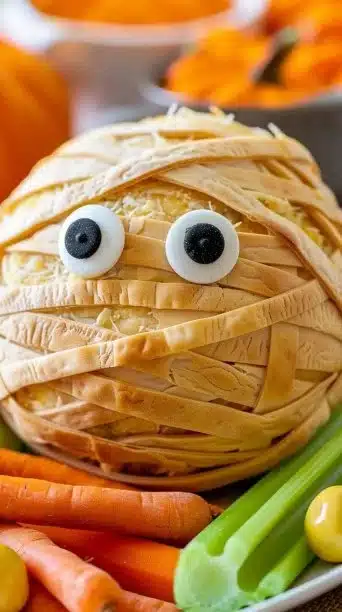
Mummy Cheese Ball
Mummy Cheese Ball
Friendly and festive, this Mummy Cheese Ball is a fun, crowd-pleasing appetizer that transforms a classic cheese spread into a playful Halloween centerpiece. Creamy, savory, and wrapped in golden crescent dough, it’s as easy to assemble as it is to devour. Pair it with crunchy crackers and fresh veggies for a party-worthy starter that’s guaranteed to disappear fast — and it’s simple enough that even last-minute hosts can pull it off.
I sometimes use recipes like this alongside other seasonal no-bake bites; if you enjoy creamy, shaped cheeseballs, you might also like this take on no-bake pumpkin cheesecake balls for a sweet counterpart: no-bake pumpkin cheesecake balls.
Why make this recipe
- It’s irresistibly visual and perfect for Halloween parties — kids and adults both love the silly mummy look.
- Quick to assemble with mostly pantry ingredients and a short chilling time.
- Customizable: swap in spices or add-ins to match your taste or dietary needs.
In short: if you want an appetizer that’s festive, flavorful, and easy to scale for a crowd, this is a great choice.
Ingredients
- 16 oz cream cheese, softened
- 2 cups sharp cheddar cheese, shredded
- 1 tsp garlic powder
- 1 tsp onion powder
- ½ tsp smoked paprika
- ½ tsp salt
- ¼ tsp black pepper
- 1 tbsp Worcestershire sauce or hot sauce (optional)
- 1 tube refrigerated crescent roll dough
- 2 candy eyes (or small pieces of olives for edible eyes)
- Crackers, pretzels, and vegetables for serving
Step-by-Step Guide to Making Mummy Cheese Ball
Prepare the cheese mixture
- In a mixing bowl, combine 16 oz softened cream cheese and 2 cups shredded sharp cheddar cheese. Add 1 tsp garlic powder, 1 tsp onion powder, ½ tsp smoked paprika, ½ tsp salt, and ¼ tsp black pepper. If you like an extra layer of tang or heat, stir in 1 tbsp Worcestershire sauce or a splash of hot sauce.
- Use a hand mixer or sturdy spatula to beat the mixture until smooth, homogenous, and spreadable. Scrape the bowl sides often so the seasonings distribute evenly.
Shape and chill the ball
- Transfer the cheese mixture onto a large piece of plastic wrap. Use the wrap to help you shape it into a tight ball. Twist the plastic wrap to compact the mixture and smooth the surface.
- Refrigerate for at least 2 hours — this firms the ball so it holds its shape while you wrap it and bake it.
Prep the crescent dough
- Preheat your oven to 375°F (190°C). Line a baking sheet with parchment paper.
- Unroll the tube of refrigerated crescent roll dough and gently roll it flat on a lightly floured surface. Use a knife or pizza cutter to slice the dough into thin strips, about 1/4 inch to 1/2 inch wide. The thinner the strips, the more “mummy bandage” effect you’ll create.
Wrap the cheese ball
- Remove the chilled cheese ball from the fridge and unwrap it. Place it on the prepared parchment-lined baking sheet. Begin wrapping the crescent dough strips around the ball in overlapping layers to mimic mummy bandages. Leave a small circular space near the top for the eyes so they can be added after baking. Tuck the ends of strips underneath the ball or press gently so they stick. Don’t worry about minor gaps — a little intentional space makes the mummy more whimsical.
Bake until golden
- Place the wrapped cheese ball in the preheated oven and bake for 15–20 minutes, or until the crescent dough is puffed and golden brown. Oven times vary, so check around 12–15 minutes to avoid over-browning. The goal is a crispy, golden exterior while the cheese inside remains chilled and spreadable.
Add the eyes and finish
- Let the baked mummy cool slightly for a few minutes so you don’t melt candy eyes (or warm olive slices) completely when inserting them. Press 2 candy eyes into the reserved space, or use small slices of olive for a savory, edible look. If using candy eyes, note they may soften slightly from oven heat but still create a fun effect.
- Transfer to a serving platter and surround with crackers, pretzels, and cut vegetables for dipping.
How long this takes (quick timeline)
- Active prep: ~15–25 minutes
- Chill time: at least 2 hours
- Bake: 15–20 minutes
- Total: ~2 hours 30 minutes (most of that is hands-off chilling)
Best Way to Store Mummy Cheese Ball
- Refrigerate: Store wrapped in plastic wrap or in an airtight container in the refrigerator for up to 3–4 days.
- Freezer: Not recommended for fully assembled and baked mummy; if you must, freeze the unbaked cheese mixture (shaped but not wrapped) in an airtight container for up to 1 month, thaw overnight in the fridge before wrapping and baking.
- Serving temperature: Keep chilled until 10–15 minutes before serving, then let sit at room temperature briefly so the cheese becomes easier to spread.
Serving Suggestions for Mummy Cheese Ball
- Classic platter: Arrange a variety of crackers (water crackers, multi-grain), pretzel twists, and sturdy vegetables like carrot sticks, cucumber rounds, and bell pepper strips. The contrast in textures — crisp crackers and creamy cheese — is what makes this so addictive.
- Themed board: Surround the mummy with small bowls of mixed nuts, marinated olives, and roasted red pepper strips. Add a few autumnal touches like roasted pumpkin seeds or cranberries for a Halloween or fall spread.
- Kid-friendly options: Offer soft breadsticks and pita chips for younger guests who might prefer milder bites. Swap candy eyes for olive slices if serving to children who will eat them.
Tips to make Mummy Cheese Ball
- Chill before wrapping: Make sure the cheese ball is well chilled and firm; this prevents it from flattening while you wrap the dough.
- Work quickly with crescent dough: If your kitchen is warm, the dough becomes sticky — keep it lightly floured and handle it briefly to make neat strips.
- Crisp, not greasy: Bake just until golden — overbaking can dry out the dough or cause the cheese underneath to soften too much.
- Eye choices: For an all-edible version, use small olive rounds or peppercorns instead of candy eyes. Candy eyes are fun visually but do soften slightly when exposed to heat.
Variations
- Spicy Jalapeño Mummy (bullet format): Stir finely chopped pickled jalapeños or canned green chiles into the cheese mixture and add a pinch more smoked paprika for heat. Top with pepper jack in place of some cheddar for an extra kick.
- Herb & Garlic (paragraph): For a fresher, more sophisticated flavor, fold in chopped fresh chives and parsley with a teaspoon of lemon zest; swap half the cheddar for grated Parmesan and skip the candy eyes in favor of sliced black olives for a savory façade.
FAQs
Q: Can I make this ahead of time?
A: Yes — you can prepare the cheese ball up to 2 days ahead, keep it wrapped in plastic, and refrigerate. Wrap with the crescent strips and bake shortly before serving for the best texture.
Q: What if I don’t have crescent roll dough?
A: Puff pastry or pre-made strips of phyllo brushed with a little butter can work as a substitute. Puff pastry will puff up more and give a flakier bandage effect.
Q: Can I make this dairy-free or vegan?
A: Vegan cream cheese and shredded vegan cheddar can substitute for the dairy; be mindful some vegan cheeses don’t firm up the same way, so chilling longer may help.
Q: How do I keep it from getting soggy?
A: Keep the cheese ball cold before wrapping and bake until the dough is just golden — this helps keep a crisp outer shell. Serve soon after cooling.
Q: Serving size?
- This recipe makes one medium-sized cheese ball suitable for 8–12 people as an appetizer, depending on appetites and other dishes offered.
More Q/A style detail:
- Q: Can I add mix-ins like bacon or nuts? A: Absolutely — cooked, crumbled bacon, toasted nuts, or chopped sun-dried tomatoes add texture and flavor. Fold them into the cheese mixture before shaping.
Final presentation tips
- For an extra theatrical touch, lightly brush the baked dough with a tiny amount of melted butter and dust a pinch of smoked paprika to emphasize the bandage detail. Use fresh herbs around the platter to add color and aroma, and provide small spreader knives for guests.
Troubleshooting common problems
- Dough tearing: If your crescent dough tears while wrapping, press strips together gently and tuck seams underneath. A little patching is part of the charm.
- Cheese leaking: If the cheese is too soft and oozes during baking, the ball wasn’t chilled long enough. Next time, freeze for 20–30 minutes before wrapping to firm it up, then bake as directed.
Occasions and pairings
- Halloween parties: This is a guaranteed hit for kid-friendly gatherings and adult costume parties alike. Pair with seasonal cocktails or a dry sparkling wine to cut the richness.
- Potlucks and game days: Because it’s portable and visually striking, the Mummy Cheese Ball works great for potlucks and tailgates. Pack the baked ball on a platter and add dippers right before serving.
- Family nights: Make a smaller version as a fun family activity — kids can wrap the mummy bandages and press the eyes in themselves.
Nutrition and scaling
- Per-serving nutrition will vary depending on portion size and exact ingredients (type of cheese, whether you use Worcestershire or hot sauce). For larger crowds, double or triple the recipe and bake on multiple sheets; keep chilled until just before baking.
Safety note
- If using candy eyes, store the finished cheese ball chilled and consume within the recommended refrigerator storage time. If using olive eyes, be mindful of sodium content for guests watching their salt intake.
Conclusion
This Mummy Cheese Ball is a playful, delicious centerpiece that’s simple to prepare and endlessly adaptable, making it a top pick for Halloween, fall gatherings, or any time you want an appetizer with personality. For another creative mummy-inspired take and presentation ideas, check out this Easy Cheese Mummy for Halloween Potluck recipe that offers helpful party tips and variations: Easy Cheese Mummy for Halloween Potluck – Eating Richly. If you’re interested in pairing savory cheeseballs with seasonal sweet options, this festive pumpkin cheese ball overview is a great companion idea: Pumpkin Cheese Ball ~ Festive Halloween Cheeseboard.
Enjoy making your mummy — it’s equal parts silly and savory, and it brings a smile to any gathering.
Print
Mummy Cheese Ball
- Total Time: 150 minutes
- Yield: 8-12 servings 1x
- Diet: Vegetarian
Description
A fun, crowd-pleasing appetizer that transforms a classic cheese spread into a playful Halloween centerpiece.
Ingredients
- 16 oz cream cheese, softened
- 2 cups sharp cheddar cheese, shredded
- 1 tsp garlic powder
- 1 tsp onion powder
- ½ tsp smoked paprika
- ½ tsp salt
- ¼ tsp black pepper
- 1 tbsp Worcestershire sauce or hot sauce (optional)
- 1 tube refrigerated crescent roll dough
- 2 candy eyes (or small pieces of olives for edible eyes)
- Crackers, pretzels, and vegetables for serving
Instructions
- In a mixing bowl, combine cream cheese and shredded cheddar. Add garlic powder, onion powder, smoked paprika, salt, black pepper, and optional Worcestershire sauce. Beat until smooth.
- Transfer the cheese mixture onto plastic wrap and shape into a ball. Refrigerate for at least 2 hours.
- Preheat oven to 375°F (190°C) and prepare a baking sheet with parchment paper. Roll out and slice crescent roll dough into strips.
- Wrap the cheese ball with dough strips, leaving space for the eyes. Tuck ends under the ball.
- Bake for 15–20 minutes until golden brown.
- Cool slightly, then insert candy eyes. Serve with crackers, pretzels, and vegetables.
Notes
For an extra touch, dust baked dough with smoked paprika and brush with melted butter. Use fresh herbs for garnish.
- Prep Time: 25 minutes
- Cook Time: 20 minutes
- Category: Appetizer
- Method: Baking
- Cuisine: American
Nutrition
- Serving Size: 1 serving
- Calories: 300
- Sugar: 2g
- Sodium: 450mg
- Fat: 22g
- Saturated Fat: 12g
- Unsaturated Fat: 8g
- Trans Fat: 0g
- Carbohydrates: 18g
- Fiber: 1g
- Protein: 10g
- Cholesterol: 60mg
Keywords: cheese ball, Halloween appetizer, festive food, party food