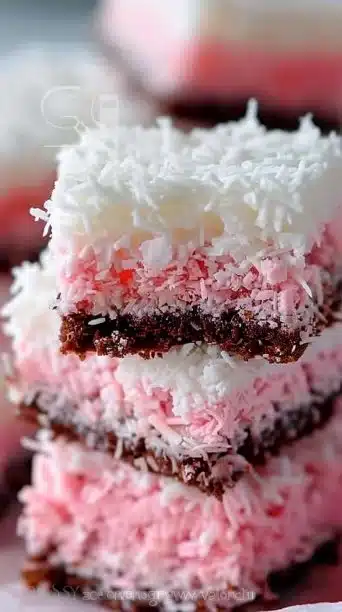
Pink Coconut Snowball Cake Bars
Pink Coconut Snowball Cake Bars
These pink coconut snowball cake bars are a playful, crowd-pleasing treat—lightly chocolatey base, pillowy whipped topping, and a snowy blanket of pink-tinted coconut. They’re easy enough for a weekday bake but pretty enough for parties and bake sales. If you love handheld desserts with a bit of nostalgic charm, these bars are a delightful twist on a classic snowball cake.
If you enjoy rich, portable dessert bars, pair them with another favorite like our moist carrot cake bars for a versatile dessert table offering.
Why make this recipe
If you’re tired of heavy, fussy cakes that take all afternoon and never seem to travel well, this recipe is perfect because it gives you a sliceable, picnic-friendly dessert with minimal fuss. The bars are easy to slice, transport, and serve—while still feeling festive thanks to the pink coconut topping. They combine familiar flavors (cocoa, coconut, cream) in a format that’s both nostalgic and practical.
Ingredients
- 1 cup all-purpose flour
- ½ cup cocoa powder
- 1 tsp baking powder
- ½ tsp baking soda
- ½ tsp salt
- ½ cup unsalted butter, softened
- 1 cup granulated sugar
- 2 large eggs
- 1 tsp vanilla extract
- ½ cup buttermilk
- ½ cup hot water
- 1 ½ cups heavy whipping cream
- ½ cup powdered sugar
- 1 tsp vanilla extract (for the whipped cream)
- 8 oz cream cheese, softened (optional, for a richer topping)
- 2 cups shredded coconut (sweetened or unsweetened)
- 2–3 drops pink food coloring
- 1 tbsp milk (to moisten coconut if needed)
Step-by-Step Guide to Making Pink Coconut Snowball Cake Bars
Baking is part technique, part timing. Below is a stepwise approach that walks you from pantry to presentation, with notes on why each step matters and ways to adapt.
Prepare and preheat
- Preheat your oven to 350°F (175°C). Grease an 8×8 or 9×9 baking pan (or line it with parchment for easy removal). Allow the oven to come fully to temperature before you bake—this ensures even rise and consistent texture.
Mix the dry ingredients
2. In a medium bowl, whisk together 1 cup all-purpose flour, ½ cup cocoa powder, 1 tsp baking powder, ½ tsp baking soda, and ½ tsp salt. Sifting the cocoa and flour together helps eliminate lumps and distributes the leavening evenly for a uniform crumb.
Cream butter and sugar
3. In a separate large bowl, cream ½ cup softened unsalted butter and 1 cup granulated sugar until light and fluffy. This step incorporates air for a tender crumb—beat for about 2–3 minutes with a hand mixer or stand mixer on medium speed.
Add eggs and flavor
4. Add the 2 large eggs, one at a time, beating well after each addition. Stir in 1 tsp vanilla extract. Eggs add structure and emulsify the batter; adding them one at a time helps them incorporate evenly.
Incorporate liquids
5. Alternate adding the dry ingredients and ½ cup buttermilk to the butter mixture, beginning and ending with the dry ingredients. Mix until just combined—overmixing develops gluten and can make bars tough. Lastly, stir in ½ cup hot water; the heat helps bloom the cocoa powder and produces a moist, chocolatey base.
Bake
6. Pour the batter into the prepared pan and spread to an even thickness. Bake in the preheated 350°F oven for 25–30 minutes, or until a toothpick inserted in the center comes out with a few moist crumbs (not wet batter). Ovens vary—start checking at 22 minutes to avoid overbaking.
Cooling
7. Allow the cake to cool completely in the pan on a wire rack. Topping a warm cake will cause the whipped cream to deflate and the coconut to sink; patience at this stage pays off in presentation and texture.
Prepare the pink coconut
8. In a bowl, toss 2 cups shredded coconut with 2–3 drops pink food coloring. Add up to 1 tbsp milk if needed to help the color distribute evenly and to slightly soften unsweetened coconut. Spread the tinted coconut on a plate or tray to dry briefly while you prepare the topping.
Make the whipped topping
9. In a chilled mixing bowl, whip 1 ½ cups heavy whipping cream with ½ cup powdered sugar and 1 tsp vanilla extract until stiff peaks form. If using the optional 8 oz softened cream cheese, beat it in a separate bowl until smooth, then gently fold it into the whipped cream for a tangy, stable topping that slices beautifully.
Assemble
10. Once the cake is completely cool, spread the whipped cream (or cream cheese-whipped mix) evenly over the top. Generously sprinkle the pink coconut all over, pressing lightly so it adheres.
Slice and serve
11. Refrigerate the assembled bars for at least 30 minutes to set, then slice into squares with a sharp knife. Wipe the knife between cuts for clean edges. Serve chilled or at cool room temperature.
Extra notes on timing and stability
- If you’ll be serving these outdoors or want the topping to be extra stable, include the cream cheese in the whipped topping; it helps prevent weeping and holds shape longer.
- For a less sweet option, use unsweetened coconut and reduce powdered sugar in the whipped cream by a tablespoon or two.
Directions (concise recipe-style summary)
- Preheat oven to 350°F (175°C).
- In a bowl, combine flour, cocoa powder, baking powder, baking soda, and salt.
- In another bowl, cream butter and sugar until fluffy. Add eggs, vanilla, buttermilk, and hot water; mix well.
- Gradually add dry ingredients to wet mixture until just combined.
- Pour batter into a greased baking pan and bake for 25–30 minutes.
- For the topping, whip heavy cream with powdered sugar and vanilla until stiff peaks form. Fold in cream cheese if using.
- Mix shredded coconut with pink food coloring and milk if needed.
- Once the cake is cool, spread whipped cream mixture on top and sprinkle with coconut.
- Slice and serve.
Best Way to Store Pink Coconut Snowball Cake Bars
- Refrigerate: 3–4 days at 35–40°F (2–4°C) — store in an airtight container to keep the topping from drying out.
- Freezer: Up to 1 month at 0°F (-18°C) — freeze uncut in a single layer, well-wrapped in plastic and foil; thaw overnight in the refrigerator before slicing.
- Room temperature (short-term): Up to 6 hours in a cool environment (below 70°F / 21°C) — best for immediate serving; avoid leaving whipped topping out in warm conditions.
How to Present Pink Coconut Snowball Cake Bars
- Serve chilled for the cleanest slices and best texture contrast between the cool whipped topping and the tender cake.
- For a party tray, arrange bars on parchment and garnish each piece with a single toasted coconut flake or a tiny edible flower for an upscale look.
- To make them hand-held picnic-friendly, cut into smaller squares about 2 inches each and refrigerate until firm; transport in a shallow, cool-sided container with parchment layers.
Tips to make Pink Coconut Snowball Cake Bars
Q: How do I keep the bars from getting soggy?
A: Make sure the cake is completely cool before adding the whipped cream topping, and avoid over-moistening the coconut—use milk sparingly. If you plan to store longer than a day, line the container with parchment and place bars in a single layer.
Q: What if my whipped cream weeps?
A: Fold in softened cream cheese or stabilize the whipped cream with a teaspoon of gelatin dissolved in a little warm water (chill slightly before folding in). Keep the bars refrigerated until serving to minimize weeping.
Q: Can I use store-bought frosting?
A: Yes, a stabilized whipped topping or mascarpone-based frosting works, but adjust sweetness to balance the coconut.
Variations
- Coconut-forward: Replace half the shredded coconut with toasted coconut for nuttier flavor and crunch. (Bullet list style)
- Tropical twist: Fold ¼ cup finely chopped dried pineapple into the whipped topping for a pineapple-coconut duo that channels a piña colada vibe. (Paragraph style)
Why this combination works
The cocoa cake base provides a slightly bitter contrast that keeps the sweet whipped topping from becoming cloying, while the coconut adds texture and a tropical note. The pink food coloring is mainly for show—its subtle pop makes these bars festive for showers, birthdays, or themed gatherings.
Baker’s notes and troubleshooting
- Dense or flat cake: Make sure your baking powder and baking soda are fresh. Overmixing the batter can also lead to a tougher crumb.
- Topping too soft: Chill the mixing bowl and beaters before whipping cream, or include cream cheese to firm it up.
- Coconut color bleeding: If you need a very bright pink, tint a small amount of the coconut and mix with the rest; avoid saturating all the coconut to reduce moisture.
Frequently Asked Questions (FAQs)
Q: Can I make these bars gluten-free?
A: Yes—substitute a 1:1 gluten-free all-purpose flour blend that contains xanthan gum. Expect slightly different crumb texture but similar results.
Q: Can I skip the food coloring?
A: Absolutely. The pink is decorative—plain shredded coconut is just as delicious and gives a classic snowball look.
Q: How far in advance can I prepare the bars?
A: Bake the cake base up to 2 days ahead (wrapped and refrigerated). Assemble no more than 24 hours before serving for best texture. For longer storage, freeze the unassembled cake base for up to 1 month.
Q: What’s the best way to toast coconut?
A: Spread coconut in a single layer on a baking sheet and toast at 325°F (160°C) for 5–8 minutes, stirring halfway, until golden. Watch closely—coconut burns quickly.
Q: Is it okay to use sweetened coconut?
A: Yes, but reduce the powdered sugar in the whipped topping slightly to balance sweetness.
Finishing touches and presentation ideas
- For holiday or bridal shower themes, press a small sugared pearl or edible glitter into the coconut layer for sparkle.
- If you want cleaner squares for a dessert platter, freeze the assembled bars for 20–30 minutes before slicing; the topping will firm up and produce neater cuts.
- To serve warm and cold contrast, briefly warm individual cake squares (without topping) and add a cool spoonful of whipped topping right before serving.
Kitchen equipment checklist
- 8×8 or 9×9 baking pan (parchment recommended)
- Electric mixer or hand mixer (for creaming and whipped topping)
- Mixing bowls and whisk
- Spatula and offset spatula (for smooth topping)
- Wire rack for cooling
- Sharp knife and clean towel for slicing
Nutrition and portioning (approximate)
A single 2×2-inch bar will be modest in calories but rich in texture—expect a decently sweet treat suitable for occasional indulgence. Use low-fat substitutions cautiously: reduced-fat cream can compromise the whipped topping’s ability to hold peaks.
Final presentation tips
- Keep bars chilled until 10–15 minutes before serving for best texture.
- If transporting, pack in a shallow cooler with ice packs beneath the sealed container to keep the topping stable during warm weather.
- For a buffet, label the tray with “Pink Coconut Snowball Cake Bars” and note if cream cheese is included for guests with dietary preferences.
Conclusion
If you want another take on pink-tinted coconut bars, check out the inspiring Pink Coconut Snowball Cake Bars recipe on The Vegnish for a vegan-friendly version with similar visual charm. For classic snowball cake inspiration and a bakery-style approach, see the Hostess-style version at Shugary Sweets’ Hostess Snowball Cake Recipe.
Print
Pink Coconut Snowball Cake Bars
- Total Time: 50 minutes
- Yield: 16 servings 1x
- Diet: Vegetarian
Description
These pink coconut snowball cake bars feature a lightly chocolatey base topped with whipped cream and pink-tinted coconut, making them a festive and nostalgic handheld dessert.
Ingredients
- 1 cup all-purpose flour
- ½ cup cocoa powder
- 1 tsp baking powder
- ½ tsp baking soda
- ½ tsp salt
- ½ cup unsalted butter, softened
- 1 cup granulated sugar
- 2 large eggs
- 1 tsp vanilla extract
- ½ cup buttermilk
- ½ cup hot water
- 1 ½ cups heavy whipping cream
- ½ cup powdered sugar
- 1 tsp vanilla extract (for the whipped cream)
- 8 oz cream cheese, softened (optional, for a richer topping)
- 2 cups shredded coconut (sweetened or unsweetened)
- 2–3 drops pink food coloring
- 1 tbsp milk (to moisten coconut if needed)
Instructions
- Preheat oven to 350°F (175°C) and grease a baking pan.
- In a bowl, whisk together flour, cocoa powder, baking powder, baking soda, and salt.
- Cream butter and sugar until light and fluffy. Add eggs, vanilla, buttermilk, and hot water; mix well.
- Gradually add the dry ingredients to the wet mixture until just combined.
- Pour the batter into a greased baking pan and bake for 25–30 minutes.
- For the topping, whip heavy cream with powdered sugar and vanilla until stiff peaks form. Fold in cream cheese if using.
- Mix shredded coconut with pink food coloring and milk if needed.
- Once the cake is cool, spread the whipped cream mixture on top and sprinkle with coconut.
- Slice and serve.
Notes
For optimal texture, chill the bars for 30 minutes after assembly. Use cream cheese in the whipped topping for extra stability if serving outdoors.
- Prep Time: 20 minutes
- Cook Time: 30 minutes
- Category: Dessert
- Method: Baking
- Cuisine: American
Nutrition
- Serving Size: 1 bar
- Calories: 250
- Sugar: 15g
- Sodium: 200mg
- Fat: 18g
- Saturated Fat: 10g
- Unsaturated Fat: 8g
- Trans Fat: 0g
- Carbohydrates: 25g
- Fiber: 1g
- Protein: 3g
- Cholesterol: 40mg
Keywords: cake bars, coconut bars, dessert, chocolate, festive treats