Plum Jam Canning Recipe: A Complete Guide for Homemade Goodness
There’s something incredibly satisfying about preserving the taste of summer in a jar. If you’ve got a bounty of ripe plums, turning them into plum jam is one of the most delicious ways to enjoy them all year round. This guide walks you through everything you need to know about making and canning your own homemade plum jam, from selecting the right fruit to troubleshooting common jam-making issues.
Table of Contents
Whether you’re a seasoned canner or trying this for the first time, learning the proper method for water bath canning ensures your jam stays shelf-stable and safe to eat. For the most reliable canning guidelines, you can refer to the National Center for Home Food Preservation, which provides USDA-tested instructions for jams and jellies.
Understanding how pectin works is key to getting that perfect jam set. If you’re curious about why your jam thickens (or doesn’t), Serious Eats offers a deep dive into pectin science to help you troubleshoot and adjust recipes confidently.
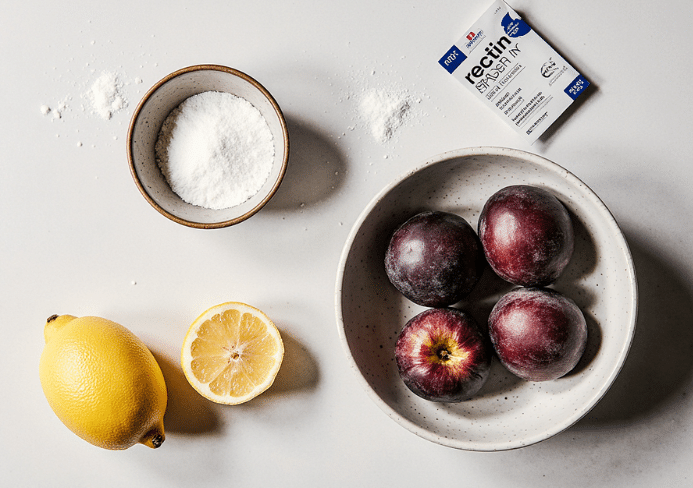
Ingredients for Homemade Plum Jam
To make a rich, flavorful plum jam, you’ll need just a few simple ingredients:
- 4 pounds of ripe plums (preferably Damson, Italian, or Santa Rosa)
- 3 cups granulated sugar (can adjust for low-sugar or sugar-free versions)
- 2 tablespoons fresh lemon juice
- 1/2 teaspoon ground cinnamon (optional)
- 1 packet of fruit pectin (optional, depending on the plum variety)
Tools and Equipment You’ll Need
Before you start, gather all your canning supplies:
- Water bath canner or a large deep pot with a rack
- 6–8 half-pint canning jars with new lids and bands
- Jar lifter, lid lifter, and canning funnel
- Potato masher or immersion blender
- Large non-reactive pot (stainless steel or enamel-coated)
How to Prepare Plums for Jam
Plums don’t need to be peeled for jam, but you do need to wash, pit, and chop them:
- Wash thoroughly under cool water
- Cut plums in half and remove pits
- Chop roughly; the skins will break down during cooking
- Optional: If you want a smoother jam, peel by blanching the plums briefly in boiling water and slipping off the skins
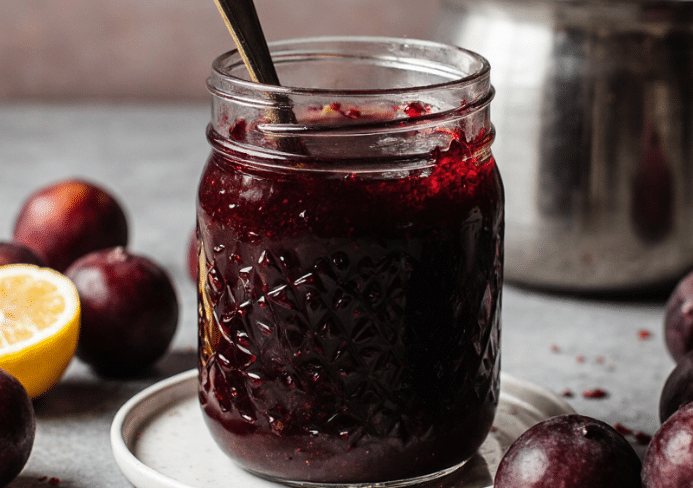
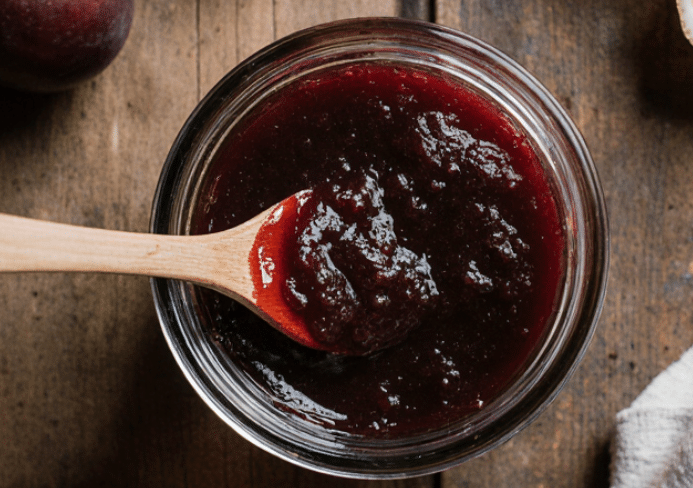
Cooking the Plum Jam
Now, let’s cook your fruit down into a jammy, aromatic preserve:
- Combine chopped plums and lemon juice in a large pot
- Simmer on medium heat until plums begin to soften
- Use a masher or blender to reach desired consistency
- Add sugar (and pectin, if using) and bring mixture to a rolling boil
- Boil hard for 1–2 minutes while stirring constantly
- Skim off any foam for a cleaner finish
To test for doneness, place a spoonful on a chilled plate. If it wrinkles when pushed, your jam is ready to jar.
Step-by-Step Water Bath Canning
Sterilizing and sealing your jars properly is essential to prevent spoilage. Here’s how to can plum jam safely:
- Sterilize jars and lids by boiling or washing in the dishwasher
- Fill hot jars with jam, leaving 1/4 inch headspace
- Wipe rims clean and apply lids and bands finger-tight
- Process in a boiling water bath for 10–15 minutes (adjust for altitude using this guide)
- Remove and cool jars undisturbed for 12–24 hours
Listen for the satisfying “pop” of jars sealing as they cool!
How to Store and Use Your Plum Jam
Once sealed, your plum jam is shelf-stable for up to 1 year in a cool, dark place. After opening, refrigerate and use within 3 weeks.
Try serving your jam:
- On toast or biscuits
- As a glaze for pork or chicken
- Paired with cheese boards
- In thumbprint cookies or tarts
Recipe Variations to Try
Get creative with these tasty variations:
- Spiced Plum Jam – Add ground cloves, cinnamon, and a splash of vanilla
- Plum & Ginger Jam – Add grated fresh ginger during cooking
- Low Sugar Jam – Use low-methoxyl pectin or reduce sugar by half
- Plum-Apple Jam – Mix equal parts plum and tart apple for a twist
Tips for First-Time Canners
Making jam can feel intimidating, but these tips will help:
- Always start with clean, sterilized jars
- Use a wide pot to avoid boiling over
- Don’t double the recipe — it affects the set
- Label jars with date and contents for easy tracking
Common Jam Troubleshooting
If something seems off with your jam, here’s how to fix it:
- Jam too runny: Reboil with added pectin or lemon juice
- Too thick: You may have overcooked; try stirring in a little hot water
- Cloudy appearance: Stirring too much or not skimming foam
- Jar didn’t seal: Refrigerate and use within 3 weeks
FAQs About Plum Jam Canning
Do you need pectin for plum jam?
Not always. Plums are naturally high in pectin, especially when under-ripe.
Do you peel plums for jam?
No, the skins cook down nicely and add color. Peel only if you prefer a smoother texture.
How long does homemade plum jam last?
Properly canned, up to 12 months in the pantry; 3 weeks once opened and refrigerated.
Can you freeze plum jam instead of canning?
Yes, store in freezer-safe containers and leave space for expansion.
What’s the right fruit-to-sugar ratio?
A general rule is 2:1 fruit to sugar, but it varies with fruit sweetness and pectin content.
Nutrition and Storage Info
A tablespoon of homemade plum jam typically contains:
- Around 40–50 calories
- Minimal fat
- Gluten-free and vegan (depending on added ingredients)
Store sealed jars in a cool, dark pantry. Refrigerate once opened.
Final Thoughts
Making your own plum jam is not only a rewarding project, but a practical way to enjoy fresh fruit all year. With a few simple tools and the right guidance, your pantry can be stocked with jewel-toned jars that make breakfast (and gifting!) extra special.
PrintPlum Jam Canning Recipe: A Complete Guide for Homemade Goodness
- Total Time: 1 hour + canning time
- Yield: 5 to 6 half-pint jars 1x
Description
A rich, fruity plum jam made with ripe plums, sugar, and lemon juice. Optional cinnamon and pectin can enhance flavor and set. Perfect for canning and long-term storage.
Ingredients
- 4 pounds ripe plums (Damson, Italian, or Santa Rosa)
- 3 cups granulated sugar
- 2 tablespoons fresh lemon juice
- ½ teaspoon ground cinnamon (optional)
- 1 packet fruit pectin (optional, based on plum variety)
Instructions
- Prepare the Plums: Wash, pit, and chop the plums. Peeling is optional depending on desired texture.
- Cook the Jam: In a large pot, combine plums and lemon juice. Simmer over medium heat until soft, stirring occasionally.
- Use a potato masher or immersion blender to achieve desired consistency.
- Add sugar and optional pectin, stirring well.
- Bring mixture to a hard boil for 1–2 minutes, stirring constantly. Test doneness by placing a small spoonful on a chilled plate—if it wrinkles when pushed, it’s ready.
- Sterilize Jars: Wash jars and lids thoroughly. Boil or run through a dishwasher cycle. Keep jars hot until ready to fill.
- Fill and Seal: Ladle hot jam into jars, leaving ¼ inch headspace. Wipe rims clean, apply lids, and screw bands finger-tight.
- Water Bath Canning: Process jars in a boiling water bath for 10–15 minutes (adjust for altitude). Remove and cool undisturbed for 12–24 hours.
- Storage: Check seals. Store sealed jars in a cool, dark place for up to 12 months. Refrigerate after opening and use within 3 weeks.
Notes
Plums vary in natural pectin levels—use added pectin if your fruit is very ripe or watery. Cinnamon adds warmth and depth, especially for fall batches.
- Prep Time: 20 minutes
- Cook Time: 40 minutes
- Category: Jam / Preserves
- Method: Stovetop + Water bath canning
- Cuisine: Homemade / Traditional
Nutrition
- Serving Size: 1 tablespoon
- Calories: 45
- Sugar: 11g
- Sodium: 0mg
- Fat: 0g
- Saturated Fat: 0g
- Unsaturated Fat: 0g
- Trans Fat: 0g
- Carbohydrates: 11g
- Fiber: 0.2g
- Protein: 0g
- Cholesterol: 0mg
Keywords: plum jam, homemade jam, plum preserves, canning, no peel plum jam, traditional jam