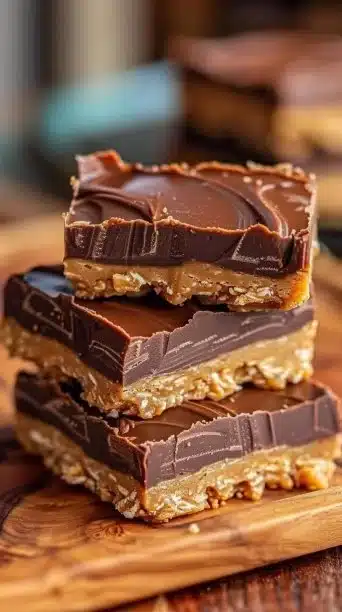
Reese’s Peanut Butter No-Bake Bars
Reese’s Peanut Butter No-Bake Bars are a fast, crowd-pleasing treat that delivers the perfect balance of creamy peanut butter and rich chocolate without turning on the oven. These bars come together in minutes, set in the fridge, and slice into addictive squares that taste like oversized Reese’s cups — only easier. If you love quick no-bake sweets, you might also enjoy a related no-bake peanut butter Easter eggs recipe we tried recently: no-bake peanut butter Easter eggs recipe.
Why make this recipe
What makes these bars special is their simplicity and the nostalgia they evoke — the flavor is pure peanut-butter-and-chocolate comfort. You don’t need special equipment, and the ingredient list is short and pantry-friendly. Perfect for last-minute dessert needs, bake sales, school treats, or simply when you want a decadent nibble without fuss.
Ingredients
- 1 cup creamy peanut butter
- 1 cup chocolate (chips or bars)
- 1/2 cup butter
- 1 cup graham cracker crumbs
- 1/4 cup powdered sugar
Step-by-Step Guide to Making Reese’s Peanut Butter No-Bake Bars
- Prepare your pan and workspace:
- Grease an 8×8 inch baking dish lightly with butter or line it with parchment paper, leaving a slight overhang for easier removal. Having the pan ready means you can press the peanut butter layer in while it’s still warm and pliable.
- Combine the dry base:
- In a large mixing bowl, whisk together 1 cup graham cracker crumbs and 1/4 cup powdered sugar until evenly blended. The powdered sugar adds a touch of sweetness and helps give the bottom layer structure.
- Melt butter and peanut butter:
- In a small saucepan over low heat (or in a microwave-safe bowl on low power), melt 1/2 cup butter and 1 cup creamy peanut butter together, stirring constantly until the mixture is completely smooth. Keep the heat gentle to prevent scorching and to maintain a glossy, pourable texture.
- Mix wet and dry:
- Pour the warm peanut butter-butter mixture into the bowl with the graham cracker crumbs and powdered sugar. Stir briskly until everything is combined and you have a uniform, slightly thick dough-like mixture.
- Press into the pan:
- Transfer the peanut butter crumb mixture into the prepared 8×8 inch pan. Use the back of a spoon, an offset spatula, or a piece of parchment to press it down firmly and evenly. Aim for an even thickness so every bar sets uniformly.
- Melt the chocolate:
- Melt 1 cup of chocolate (chips or chopped bars) in a microwave-safe bowl in 20–30 second bursts, stirring between each interval until smooth. Alternatively, use a double boiler: place a heatproof bowl over a small pot of simmering water, chocolate in the bowl, stirring until melted and silky.
- Pour chocolate over the peanut butter layer:
- Pour the melted chocolate over the pressed peanut butter layer and spread it into an even layer with a spatula. For a rustic look, make gentle swirls; for a clean finish, smooth it completely.
- Chill until set:
- Place the pan in the refrigerator and chill until the chocolate is firm and the bars hold their shape, about 1–2 hours. For quicker sets, pop the dish into the freezer for 20–30 minutes, but watch closely to avoid freezing solid.
- Slice and serve:
- Remove the pan from the fridge and lift the bars out using the parchment overhang (if used). Slice into squares with a sharp knife — warming the knife briefly under hot water and wiping it dry between cuts will give you the cleanest edges.
Best Way to Store Reese’s Peanut Butter No-Bake Bars
- Room temperature: 1–2 days at about 68–72°F (20–22°C) if kept in an airtight container and your kitchen is cool.
- Refrigerator: 1–2 weeks at 35–40°F (2–4°C) in an airtight container; best for longer freshness and to keep the chocolate firm.
- Freezer: Up to 2 months at 0°F (-18°C); wrap bars individually in plastic wrap and place in a freezer-safe container or bag for best results.
Serving Suggestions for Reese’s Peanut Butter No-Bake Bars
- Cut bars into small squares and serve on a dessert platter with a dusting of powdered sugar for parties.
- Pair a bar with a scoop of vanilla ice cream or a dollop of whipped cream for a simple, indulgent dessert.
- For a coffee break, serve with a robust black coffee or a latte — the bitterness of the coffee balances the sweetness beautifully.
- For kids’ lunchboxes, wrap individual bars in parchment and store in a small cooler pack to keep them firm until snack time.
Tips to make Reese’s Peanut Butter No-Bake Bars
- Use creamy peanut butter for the smoothest texture; natural peanut butters with oil separation can be used but may alter consistency.
- Warm your knife under hot water and dry it between cuts to get neat, glossy slices.
- If you prefer a firmer bottom layer, add an extra 1/4 cup of graham cracker crumbs (or up to 1/2 cup total) to improve structure.
Variations and Substitutions
- Chocolate swap (bullet format): Use semi-sweet chocolate for a classic contrast, milk chocolate for sweeter bars, or dark chocolate (70% cacao) for a richer, less sweet finish. If you want a swirl effect, melt peanut butter with a tablespoon of coconut oil and lightly drizzle over the chocolate before it sets.
- Nut-free or allergy-friendly (paragraph): To make these bars nut-free, substitute the peanut butter with a sunflower seed butter or soy nut butter. These alternatives mimic the creamy texture and nutty flavor without using peanuts, making the bars safe for nut-free classrooms or events. Adjust sweetness to taste if the substitute is more or less sweet than standard peanut butter.
FAQs
Q: How long do these bars need to chill before cutting?
A: Typically 1–2 hours in the refrigerator. If you’re short on time, 20–30 minutes in the freezer will work—just watch so they don’t freeze solid.
Q: Can I use crunchy peanut butter instead of creamy?
A: Yes — crunchy will add texture and a more pronounced peanut crunch. The bars may be slightly more crumbly but still delicious.
Q: Can I double the recipe?
A: Absolutely. Double the ingredients and use a 9×13 inch pan for the same thickness; chill time may be a bit longer for the larger mass.
Q: What’s the best way to get clean slices?
A: Warm a knife under hot water, dry it, then slice in one smooth motion. Wipe the blade between cuts for best results.
Q: Can I make these in advance for a party?
A: Yes. They store well in the refrigerator for up to two weeks or in the freezer for up to two months when wrapped properly.
Q: Are these bars suitable for bake sales or gifting?
- Wrap individual bars in parchment paper or place in small treat boxes for gifting; mark with allergen info if serving publicly.
More tips and troubleshooting
- If the chocolate topping separates or becomes grainy, it may have been overheated. Gently stir in a teaspoon of vegetable oil or coconut oil to smooth it, or remelt over a double boiler at very low heat.
- If the peanut butter layer is too oily (common with natural peanut butter), add a few extra tablespoons of graham cracker crumbs or 1–2 tablespoons of powdered sugar to absorb excess oil and firm the texture.
Flavor pairing ideas
- Sprinkle flaky sea salt over the chocolate before chilling to enhance the sweet-and-salty contrast.
- Add a teaspoon of vanilla extract or a pinch of cinnamon to the peanut butter mixture for a subtle, warm layer of flavor.
- For a more textured base, replace half the graham cracker crumbs with finely chopped pretzels or shortbread cookies.
Occasions and portability
These bars are ideal for potlucks, picnics (kept cool), school events (if no peanut restrictions exist), bake sales, and gift giving. Their no-bake nature also makes them perfect for hot weather when you don’t want to turn on the oven.
Troubleshooting common issues
- If the bars are too crumbly: Press the peanut butter layer more firmly into the pan and consider increasing the butter slightly (by 1–2 tablespoons) or adding a little more powdered sugar to bind.
- If the chocolate layer cracks when cutting: Allow the bars to sit a few minutes at room temperature to soften slightly before slicing. A semi-warm blade also helps prevent cracking.
- If the chocolate is dull instead of glossy: Try melting with a small amount of oil or butter for a shinier finish and smoother mouthfeel.
Nutrition and portion control
These bars are rich and calorie-dense due to peanut butter and chocolate. Cut into smaller pieces for portion control or serve with fresh fruit to balance the indulgence.
Variation (comparison-style)
- Classic vs. Healthier: Classic uses regular creamy peanut butter and milk or semi-sweet chocolate for the familiar indulgent flavor. For a healthier twist, use natural peanut butter (stirred well) and dark chocolate (70% cacao) and reduce the powdered sugar slightly; texture will be less sweet but still satisfying.
FAQs (different style)
- What if my peanut butter separates? Stir until smooth, or gently warm it to recombine before measuring. If it remains oily after mixing, add a touch more graham cracker crumbs.
- Is there a vegan version? Yes — use plant-based butter and vegan chocolate chips, and ensure your powdered sugar is vegan-friendly. Texture will be similar and flavor just as satisfying.
- Can I add mix-ins? Chopped peanuts, toffee bits, or mini chocolate chips can be folded into the peanut butter base before pressing for extra texture.
Storage recap (quick reference)
- Airtight container, refrigerator: 1–2 weeks at 35–40°F (2–4°C).
- Freezer, sealed: Up to 2 months at 0°F (-18°C).
- Room temperature (cool room): 1–2 days at ~68–72°F (20–22°C).
Final presentation ideas
- For events, place bars on parchment-lined trays and garnish with a light sprinkle of cocoa powder or sea salt. For a festive look, drizzle with melted white chocolate before serving. If gifting, stack with waxed paper between layers and tie with a ribbon for a homemade touch.
Conclusion
These Reese’s Peanut Butter No-Bake Bars are a dependable, nostalgic treat that’s fast to make and hard to resist. For another take on no-bake peanut butter confections, see The Recipe Critic’s Reese’s No Bake Peanut Butter Bars for an alternate method and tips. If you’d like a detailed review and tasting notes comparing similar no-bake recipes, check out this write-up for more perspective: These No-Bake Bars Taste Just Like Reese’s Cups | The Kitchn.
Enjoy making (and eating) these speedy bars — they’re a go-to whenever you crave peanut butter and chocolate without the fuss.
Print
Reese’s Peanut Butter No-Bake Bars
- Total Time: 120 minutes
- Yield: 16 servings 1x
- Diet: Vegetarian
Description
Quick and delicious Reese’s Peanut Butter No-Bake Bars that offer the perfect blend of creamy peanut butter and rich chocolate, ready in minutes.
Ingredients
- 1 cup creamy peanut butter
- 1 cup chocolate (chips or bars)
- 1/2 cup butter
- 1 cup graham cracker crumbs
- 1/4 cup powdered sugar
Instructions
- Grease an 8×8 inch baking dish lightly with butter or line it with parchment paper.
- In a large mixing bowl, whisk together graham cracker crumbs and powdered sugar until blended.
- Melt butter and peanut butter together in a saucepan over low heat or in a microwave-safe bowl.
- Pour the warm peanut butter-butter mixture into the dry ingredients and mix until combined.
- Transfer the mixture into the prepared pan and press down firmly.
- Melt the chocolate in a microwave-safe bowl or using a double boiler until smooth.
- Pour the melted chocolate over the peanut butter layer and spread evenly.
- Chill in the refrigerator until set, about 1–2 hours.
- Slice into squares and serve.
Notes
For best results, store in an airtight container. These bars can be made a few days in advance and stored in the fridge.
- Prep Time: 15 minutes
- Cook Time: 0 minutes
- Category: Dessert
- Method: No-Bake
- Cuisine: American
Nutrition
- Serving Size: 1 square
- Calories: 250
- Sugar: 12g
- Sodium: 150mg
- Fat: 16g
- Saturated Fat: 7g
- Unsaturated Fat: 5g
- Trans Fat: 0g
- Carbohydrates: 25g
- Fiber: 1g
- Protein: 5g
- Cholesterol: 20mg
Keywords: no-bake, dessert, peanut butter, chocolate, quick treat